Orange Creamsicle Dream Bars: Creamy and Zesty

- Time: 20 min active + 6 hrs chilling = 6 hrs 20 mins total
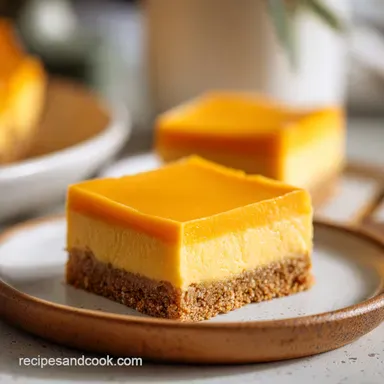
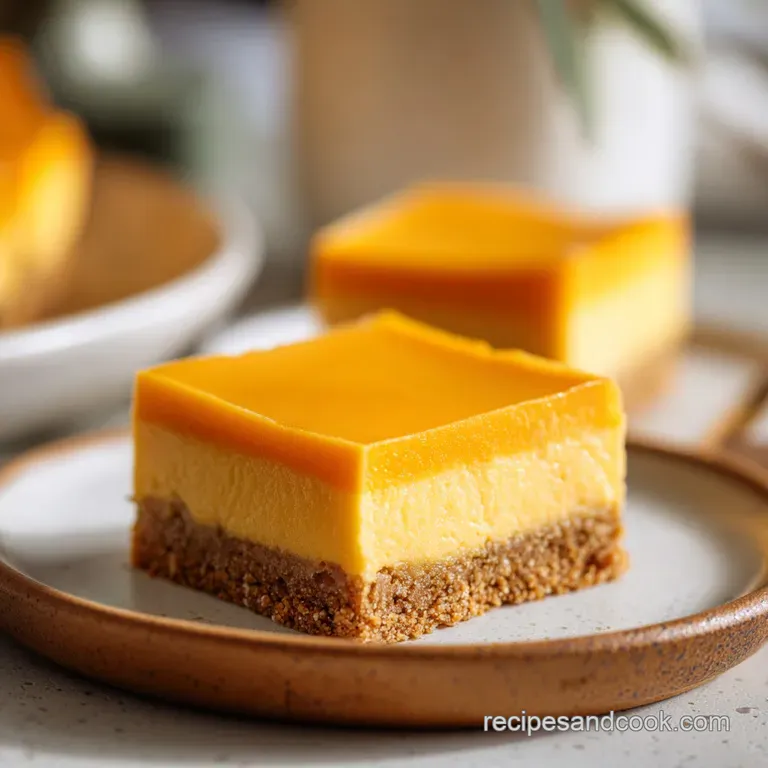
- Flavor/Texture Hook: Velvety cream center with a shatter crisp crust and a glowy orange top
- Perfect for: Summer potlucks, nostalgia themed parties, or a beginner friendly dessert showstopper
The smell of fresh orange zest hitting a bowl of whipped cream is honestly one of my favorite things in the world. It's that instant hit of sunshine that makes you feel like you're eight years old again, holding a melting popsicle on a porch in July. But for the longest time, I couldn't get the layers right at home.
The big problem I always hit was the "bleed." You know what I mean, where the orange gelatin just sinks into the cream layer, turning the whole thing into a pale, muddy orange mush. It's frustrating when you're aiming for those clean, bakery worthy lines and you end up with something that looks like a citrus accident.
That's why I'm sharing this specific method. By using a quick freeze between steps, we lock those colors in place. These Orange Creamsicle Bars aren't just about the flavor, they're about that visual pop and the velvety contrast of textures. Trust me, once you see those sharp layers, you'll never go back to the "pour and pray" method.
The Secret to Orange Creamsicle Bars
When you're making a no bake dessert, you're basically playing with temperature and stability. Since we aren't using heat to set the structure, we rely on fats and proteins to do the heavy lifting.
The Flash Freeze: Putting the crust and cream layers in the freezer for short bursts prevents the subsequent liquid layers from soaking in or mixing. It creates a temporary "skin" that keeps the colors separate.
Fat Stabilization: The cream cheese acts as an anchor for the whipped cream. Without it, the heavy cream would be too airy and could collapse under the weight of the gelatin, leading to a rubbery, uneven middle.
Gelatin Hydration: Using boiling water ensures the proteins in the gelatin fully unwind and bond. If the water isn't hot enough, you get those annoying little lumps that ruin the velvety finish.
Air Incorporation: Folding instead of beating the final cream layer keeps the texture light. If you over mix, you lose the "cloud" feel and end up with something too dense.
| Method | Set Time | Texture | Best For |
|---|---|---|---|
| Fast (Fridge Only) | 12 hours | Soft, blended edges | Casual home snacking |
| Classic (Flash Freeze) | 6 hours 20 mins | Sharp, distinct layers | Impressive parties |
Component Breakdown
| Ingredient | Science Role | Pro Secret |
|---|---|---|
| Cream Cheese | Structural Base | Must be room temp to avoid lumps |
| Gelatin Powder | Setting Agent | Whisk vigorously to remove all crystals |
| Heavy Cream | Aeration | Keep chilled until the very last second |
| Graham Crumbs | Foundation | Press firmly to prevent crumbling |
What You'll Need
For the base, we're going for a classic buttery crunch. Use a high-quality graham cracker for that toasted flavor.
- 1.5 cups (150g) graham cracker crumbs Why this? Provides the essential salty sweet crunch
- 1/3 cup (75g) unsalted butter, melted Why this? Binds the crumbs into a solid base
- 2 tbsp (25g) granulated sugar Why this? Adds a slight caramel note when chilled
For the creamy middle, we need ingredients that hold their shape.
- 8 oz (225g) cream cheese, softened Why this? Gives the bars their body and tang
- 1/2 cup (60g) powdered sugar Why this? Dissolves instantly for a smooth finish
- 1 tsp (5ml) vanilla extract Why this? Rounds out the citrus sharpness
- 1.5 cups (350ml) heavy whipping cream Why this? Creates that signature "creamsicle" airiness
For the citrus top, we want a vibrant, translucent glow.
- 1 package (85g) orange gelatin powder Why this? Provides the iconic color and flavor
- 1 cup (240ml) boiling water Why this? Fully activates the gelatin proteins
- 1/2 cup (120ml) cold water Why this? Quickly brings the temp down for pouring
- 1/2 tsp (2.5ml) orange extract Why this? Deepens the flavor beyond just "sugar"
Ingredient Swaps
| Original Ingredient | Substitute | Why It Works |
|---|---|---|
| Graham Crumbs | Digestive Biscuits | Similar texture. Note: Slightly more wheaty flavor |
| Heavy Cream | Full Fat Coconut Cream | Similar fat content. Note: Adds tropical notes |
| Orange Gelatin | Unflavored Gelatin + Orange Juice | More natural color. Note: Needs extra sugar |
If you're planning a big spread and want a savory contrast to these sweet treats, my Homemade Cheddar Crackers recipe is a winner. The salty cheese balances the citrus sugar beautifully.
Essential Kitchen Gear
You don't need a professional bakery, but a few specific tools make this foolproof. A 9x9 inch square baking pan is non negotiable for the proportions to work. I always use parchment paper with an overhang, which lets me lift the whole block out for a clean cut.
For the cream layer, a hand mixer is great, but a sturdy spatula is where the magic happens during the folding process. If you have a whisk, keep it handy for the gelatin to ensure there are no "sugar beads" left in the water.
How to Make It
Right then, let's crack on. Follow these steps exactly, especially the chilling times, to ensure your Orange Creamsicle Bars look as good as they taste.
Phase 1: Constructing the Base
- Line a 9x9 inch square baking pan with parchment paper, leaving an overhang on the sides. Note: This makes removal a breeze
- Combine graham cracker crumbs, melted butter, and granulated sugar in a bowl until the mixture resembles wet sand.
- Press the mixture firmly into the bottom of the pan and freeze for 10 minutes to set. until the crust feels solid to the touch
Phase 2: Folding the Cream Filling
- Beat softened cream cheese and powdered sugar together until smooth and lump free. Note: Room temp cheese is key here
- Stir in the vanilla extract.
- Gently fold in the heavy whipping cream using a spatula until the mixture is a uniform, cloud like white. until no streaks of cream remain
- Spread the cream mixture evenly over the chilled crust and freeze for 30 minutes.
Phase 3: Setting the Citrus Crown
- Dissolve the orange gelatin powder in boiling water, whisking vigorously until no crystals remain. Note: According to King Arthur Baking, proper hydration is essential for a clean set
- Stir in the cold water and orange extract.
- Pour the orange mixture over the frozen cream layer.
- Refrigerate for a minimum of 6 hours until fully set. until the top is firm and doesn't jiggle excessively
Chef's Tip: To get a truly professional cut, dip your knife in hot water and wipe it dry between every single slice. This prevents the gelatin from dragging the cream layer upward.
Fixing Common Bar Blunders
Even with a plan, things can go sideways. The most common issue is a "rubbery" top. This usually happens if the gelatin wasn't whisked enough or if the boiling water wasn't actually boiling.
Troubleshooting Common Issues
| Issue | Solution |
|---|---|
| Why Your Layers Bleed | If your orange layer is sinking into your white layer, you likely skipped the 30 minute flash freeze. Without that chilled barrier, the warm gelatin melts the top of the cream, causing them to merge. |
| Why Your Top Is Rubbery | This is often caused by over beating the cream layer or using a gelatin substitute that doesn't dissolve fully. Ensure you're folding the cream gently and using boiling water for the powder. |
| Why Your Crust Crumbles | A crumbling crust usually means the butter didn't fully coat the crumbs or you didn't press them firmly enough. Use the bottom of a flat measuring cup to pack the crumbs down hard. |
Success Checklist:
- ✓ Cream cheese is completely softened
- ✓ Gelatin is fully dissolved with no crystals
- ✓ Crust is pressed firmly with a flat tool
- ✓ Layers were flash frozen before adding the next
- ✓ Knife was heated before slicing
Adjusting the Batch Size
If you're making these for a small family gathering, you can easily scale them down. For a half batch, use a 4x4 or 5x5 inch pan. Reduce the chilling time by about 20%, but still do the flash freeze steps.
When dealing with a half egg or a partial measure of cream cheese, I find it's easiest to weigh the ingredients in grams.
For a double batch, I recommend using two separate 9x9 pans rather than one giant one. This ensures the center sets at the same rate as the edges. If you use a larger pan, keep the salt and extracts at 1.5x instead of 2x, as those flavors can become overpowering in larger volumes.
If you enjoy this kind of creamy, chilled dessert, you might also like the Rusty Nail Cocktail for an adult themed citrus party. Both bring that bold, bright energy to the table.
Truths About No Bake Desserts
Some people tell you that no bake bars aren't "real" desserts because they don't involve a kitchen oven. Honestly, that's nonsense. The technique involved in managing emulsions and gelatin sets is just as precise as baking a cake.
Another myth is that you can't use fresh orange juice instead of gelatin. You can, but you'll need to add unflavored gelatin to get the same stability. Fresh juice alone will result in a puddle, not a bar.
Storage Guidelines
These Orange Creamsicle Bars need to stay cold to keep their structure. Store them in an airtight container in the fridge for up to 5 days.
For longer storage, you can freeze them for up to 2 months. Just wrap the entire block in foil and plastic wrap before slicing. When you're ready to eat, let them thaw in the fridge for a few hours rather than on the counter to avoid condensation "sweat" on the gelatin.
To avoid waste, if you have leftover graham cracker crumbs or melted butter, mix them with a bit of honey and press them into mini muffin tins for quick snack bites.
Presentation Tips
To make these look bakery worthy, we focus on color balance. You have the golden brown base, the cloud white middle, and the neon orange top. Adding a few contrast accents makes them pop.
- 1. Bright Green
- Place a tiny mint leaf on each square just before serving.
- 2. Deep Red
- Add a single raspberry or a slice of strawberry on top of the orange layer.
- 3. Vibrant Orange
- Grate fresh orange zest over the top for a textured, matte finish.
Add the zest and mint at the very last second, as the mint will wilt and the zest can bleed into the gelatin if left too long. For the most "showstopping" result, serve these on a white platter to let the orange hue really shine.
These Orange Creamsicle Bars are a foolproof way to bring a bit of childhood joy to your table. Once you nail the flash freeze, you've got a dessert that's as stunning to look at as it is to eat. Enjoy!
Recipe FAQs
Did they stop making orange creamsicle?
No, they are still widely available. However, making these bars from scratch allows you to control the quality of ingredients and achieve a richer flavor profile.
Why are my orange and cream layers bleeding into each other?
You likely skipped the 30-minute flash freeze. Without this chilled barrier, the warm gelatin melts the top of the cream layer, causing the colors to merge.
Can I substitute the graham cracker crust?
Yes, similar crumb based bases work. If you enjoyed mastering the pressed crust technique in our classic magic bars, apply that same firm pressure here to prevent crumbling.
How to prevent the orange layer from becoming rubbery?
Dissolve the gelatin powder in boiling water and whisk vigorously until no crystals remain. Ensure you fold the cream layer gently to avoid over incorporating air.
How to freeze these bars for long term storage?
Wrap the entire block in foil and plastic wrap before freezing for up to 2 months. Thaw them in the fridge for a few hours rather than on the counter to avoid condensation.
Is it true that I don't need to press the crust firmly?
No, this is a common misconception. Pressing the mixture firmly into the bottom of the pan is essential to ensure the bars hold their shape when sliced.
Can I cut these bars after two hours of refrigeration?
No, they require at least 6 hours. The gelatin needs this full window to set completely and support the weight of the cream layer without collapsing.
Orange Creamsicle Bars