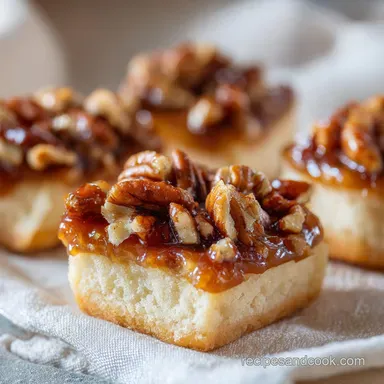
Turtle Bars: Buttery Shortbread & Pecan Caramel

- Time: 20 min active + 25 min cook + 2 hours chilling = Total 2 hours 45 mins
- Flavor/Texture Hook: Buttery crunch meets a chewy, salty sweet caramel pull
- Perfect for: Holiday platters, potlucks, or a showstopping dessert for guests
The smell of browning butter and toasted pecans hitting a hot pan is enough to make anyone in the house run to the kitchen. I remember the first time I brought these to a neighborhood get together, and they were gone before the coffee was even poured.
I had spent the afternoon obsessing over the layers, making sure the caramel didn't soak into the crust, and the payoff was a dessert that looked like it came from a high end boutique.
The goal here is all about the contrast. You want that initial shatter of the shortbread, followed by the slow, chewy pull of the caramel, and ending with a smooth, rich chocolate snap. These Turtle Bars are basically the candy shop experience but in a sliceable format.
If you've ever struggled with dessert bars that turn into one big, mushy blob, you're in the right place. We're going to focus on specific checkpoints to ensure your layers stay separate and your textures stay distinct. Trust me, once you see that clean slice, you'll never go back to store-bought treats.
The Secret to Turtle Bars Texture
Getting the layers right isn't about luck, it's about managing the moisture and heat. Since we're dealing with sugar and fats, the way they interact determines if your bar is a cohesive treat or a sticky mess.
The Sugar Barrier: The shortbread base is baked first, which creates a semi solid wall of fat and flour. This prevents the liquid caramel from soaking in and turning the bottom soggy.
Condensed Milk Stability: Using sweetened condensed milk instead of a traditional sugar water syrup means the caramel is already "pre stabilized." It gives you a thick, velvety consistency without the risk of the sugar crystallizing into grains.
Temperature Timing: Adding the chocolate while the caramel is cooling, but not boiling, ensures the chocolate spreads evenly without melting into the layer below. It creates a sharp line between the gold and the dark brown.
Nut Integration: Folding the pecans into the caramel rather than layering them on top keeps the nuts suspended. This ensures every single bite has a crunch, rather than some pieces being all caramel and others being all nut.
| Method | Time | Texture | Best For |
|---|---|---|---|
| Oven Caramelization | 25 minutes | Chewy and set | Slicing into clean bars |
| Stovetop Only | 15 minutes | Softer and gooier | Spooning into bowls |
| Slow Cooker | 4 hours | Deeply caramelized | Very soft, fudge like consistency |
Component Analysis
| Ingredient | Science Role | Pro Secret |
|---|---|---|
| All Purpose Flour | Provides the structural skeleton | Measure by weight for a consistent snap |
| Condensed Milk | Acts as the thickening agent | Use full fat for a more velvety mouthfeel |
| Unsalted Butter | Creates the "short" texture | Melt it slowly to avoid separating the fats |
| Semisweet Chips | Provides the final flavor balance | Add a pinch of salt to cut the sugar |
The Building Blocks
For the base, I use a standard all purpose flour. According to the guides at King Arthur Baking, the protein content in AP flour is the sweet spot for shortbread, providing enough structure to hold the weight of the caramel without becoming tough like a bread.
The Crust
- 1/2 cup (115g) unsalted butter, meltedWhy this? Creates a rich, sandy crumb
- 1/4 cup (50g) granulated sugarWhy this? Helps the edges brown slightly
- 1 cup (125g) all purpose flourWhy this? Standard structure for bars
- 1/4 tsp (1.5g) salt Why this? Balances the sweetnessSubstitution: Use almond flour for a nuttier, softer base (Note: will be more fragile).
The Gooey Center
- 1 can (14 oz / 397g) sweetened condensed milkWhy this? Foolproof caramel base
- 1/2 cup (115g) unsalted butterWhy this? Adds creaminess and shine
- 1/2 cup (100g) packed light brown sugarWhy this? Adds a deep molasses note
- 1 cup (115g) chopped pecans Why this? Classic turtle flavor profileSubstitution: Walnuts work well if you prefer a slightly more bitter nut.
The Chocolate Finish - 1 cup (175g) semisweet chocolate chips Why this? Stable melting point - 2 tbsp (30g) unsalted butter Why this? Gives the chocolate a glossy sheenSubstitution: Dark chocolate (70% cocoa) for a more adult, less
Sweet version.
Essential Tools for Success
You don't need a professional kitchen for this, but a few things make it way easier. An 8x8 inch baking pan is mandatory here; if you go larger, your layers will be too thin and the bars will lose that signature chew.
I always line my pan with parchment paper, leaving an overhang on the sides. This is a non negotiable for me because trying to lift these out of a pan without paper is a recipe for heartbreak. Also, a heavy bottomed saucepan is key for the caramel to prevent the condensed milk from scorching on the bottom.
If you have a digital scale, use it. Volume measurements for flour can vary wildly depending on how you scoop, and in a shortbread base, an extra 20 grams of flour can turn a snappy crust into a dry biscuit.
The Cooking Process
Let's get into it. This is a three phase process: the foundation, the filling, and the glaze.
Phase 1: Pressing the Foundation
Preheat your oven to 350°F (175°C). In a medium bowl, stir together your melted butter, granulated sugar, flour, and salt. Mix until a soft, sandy dough forms. Press this mixture firmly into the bottom of your parchment lined 8x8 inch pan.
Use the bottom of a measuring cup to get it really flat and even. Bake for 12-15 minutes until the edges are barely golden.
Phase 2: The Caramel Melt
While the crust is finishing, grab your saucepan. Over medium heat, melt the 1/2 cup of butter and brown sugar into the condensed milk. You need to stir this constantly. Keep going until the mixture is smooth and bubbling. Once it reaches that state, fold in your chopped pecans.
Pour this golden mixture directly over the hot shortbread crust and spread it to the corners. Pop the pan back in the oven for 5-8 minutes to let the caramel set.
Phase 3: The Final Glaze
Now for the chocolate. Use a microwave in 30 second bursts, stirring in between, or use a double boiler to melt the chocolate chips and 2 tbsp of butter. Stir until it's a glossy, velvety liquid. Pour the chocolate over the caramel layer, tilting the pan to ensure every inch is covered.
Chef Note: For a professional look, let the chocolate set for 10 minutes, then sprinkle a tiny bit of flaky sea salt on top. It adds a color accent and cuts through the richness.
Now comes the hardest part: patience. Let the bars cool at room temperature first. Then, move them to the fridge for 2 hours to fully set. If you cut them too early, the caramel will ooze out, and you'll lose those clean lines.
| Original Ingredient | Substitute | Why It Works |
|---|---|---|
| Semisweet Chips | Dark Chocolate | Deeper flavor. Note: Less sweet, might need a pinch more salt |
| Pecans | Walnuts | Similar crunch. Note: Slight change in flavor profile |
| Condensed Milk | Evaporated Milk + Sugar | Similar base. Note: Requires longer reduction time |
How to Fix Common Problems

Even for seasoned cooks, these bars can be tricky. The most common issue is the "ooze factor," where the layers bleed into each other. This usually happens when the chocolate is added to caramel that is still boiling, or when the bars are cut before they've chilled.
Troubleshooting Common Issues
| Issue | Solution |
|---|---|
| Why Your Caramel is Too Runny | If your caramel feels more like a sauce than a fudge, you likely didn't let it bubble long enough on the stove. The bubbling phase is where the water evaporates and the sugars concentrate. If it's alr |
| Why Your Chocolate Blooms | That white, powdery look on the chocolate is called bloom. It happens when the chocolate is overheated or cooled too rapidly. To avoid this, use the 30 second microwave burst method and never let the |
| Why Your Base is Soggy | A soggy base usually means the crust wasn't baked long enough or was pressed too loosely. Ensure the edges are golden and the dough is compressed firmly into the pan to create that moisture barrier. < |
Adjusting Your Batch Size
If you're making these for a small group or a massive party, you can't just double everything blindly.
Scaling Down (Half Batch) For a half batch, use a loaf pan instead of an 8x8. Reduce the base baking time by about 20%, as thinner layers cook faster. If the recipe calls for an egg (though this one doesn't), beat it first and use half.
Scaling Up (Double Batch) When doubling, I recommend working in two separate 8x8 pans rather than one large sheet pan. If you use a larger pan, the caramel may not set evenly in the middle.
For the chocolate layer, keep the ratio the same, but be careful not to overheat the larger volume of chocolate in the microwave.
If you're looking for other bar ideas for a party, my Smores Brownie Bars recipe is another huge hit that uses a similar layering technique.
| Scale | Pan Size | Temp Adjustment | Time Adjustment |
|---|---|---|---|
| 1x | 8x8 inch | 350°F | Standard |
| 0.5x | Loaf pan | 350°F | Reduce base by 3 mins |
| 2x | Two 8x8 pans | 325°F (if one large pan) | Extend by 5-10 mins |
Common Kitchen Misconceptions
There's a lot of noise about candy making, but let's clear a few things up. First, you do not need a candy thermometer for this recipe. Because we use condensed milk, the sugar is already stabilized. You just need to watch for the bubbles.
Another myth is that you should use salted butter for the crust to add flavor. Honestly, don't do it. Use unsalted butter and add a measured amount of salt. This gives you total control over the flavor balance, which is crucial when you have the intense sweetness of condensed milk.
Finally,, some people think you can skip the second bake for the caramel. You can, but your Turtle Bars won't have that same "chew." That short burst in the oven helps the caramel bond with the crust and set into a fudge like consistency.
Preservation Secrets
Since these are heavy on butter and sugar, they stay fresh for quite a while. Store them in an airtight container in the fridge for up to 5 days. I find they actually taste better on day two once the flavors have had time to meld.
For long term storage, these freeze beautifully. Wrap individual bars in parchment paper and place them in a freezer bag. They'll stay good for up to 3 months. To eat them, just let them thaw in the fridge overnight.
To avoid waste, if you have leftover chopped pecans, toast them in a dry pan and sprinkle them over oatmeal or yogurt. If you have a bit of melted chocolate left in the bowl, don't waste it - drizzle it over some sliced apples for a quick snack. For more ideas on using oats and nuts, check out my Peanut Butter Oatmeal Bars.
Serving and Color Strategy
To make these look like they came from a bakery, you need to think about the visual contrast. The dark chocolate and golden caramel are great, but they need a "pop" of color to look professional.
- 1. Sea Salt Flakes
- Add these immediately after pouring the chocolate. The white crystals against the dark brown create a high end look.
- 2. Orange Zest
- A tiny bit of fresh orange zest on top adds a bright orange speck and a citrus aroma that cuts through the fat.
- 3. Fresh Raspberries
- Place a single raspberry on each square just before serving. The vibrant red against the chocolate is stunning.
Pair these with something acidic to balance the richness. A tart raspberry coulis or a simple cup of black coffee is the way to go. Because they're so decadent, a small square is usually enough to satisfy that sweet tooth.
Recipe FAQs
Can I store these at room temperature?
No, refrigerate them for 2 hours first. This ensures the caramel and chocolate layers set firmly for clean slicing.
How to prevent the chocolate from scorching?
Heat in 30-second bursts in the microwave. Stir between each interval to ensure the chocolate and butter melt evenly.
Why is my caramel layer too runny?
You likely didn't let it bubble long enough on the stove. The bubbling phase is essential to evaporate water and concentrate the sugars so the layer sets.
How to bake the crust to avoid a soggy base?
Bake at 350°F for 12-15 minutes. Ensure the dough is pressed firmly into the parchment lined pan and the edges are barely golden.
Is it true that I must use a double boiler for the chocolate?
No, this is a common misconception. Using the microwave in 30-second bursts is an effective and faster alternative.
Why does my chocolate topping have a white powdery look?
The chocolate bloomed due to overheating or rapid cooling. Use the microwave burst method and let the bars cool at room temperature before refrigerating.
How to assemble the layers?
Pour the caramel and pecans over the hot crust, bake for 5-8 minutes to set, then spread the melted chocolate and butter over the top.
Pecan Turtle Bars