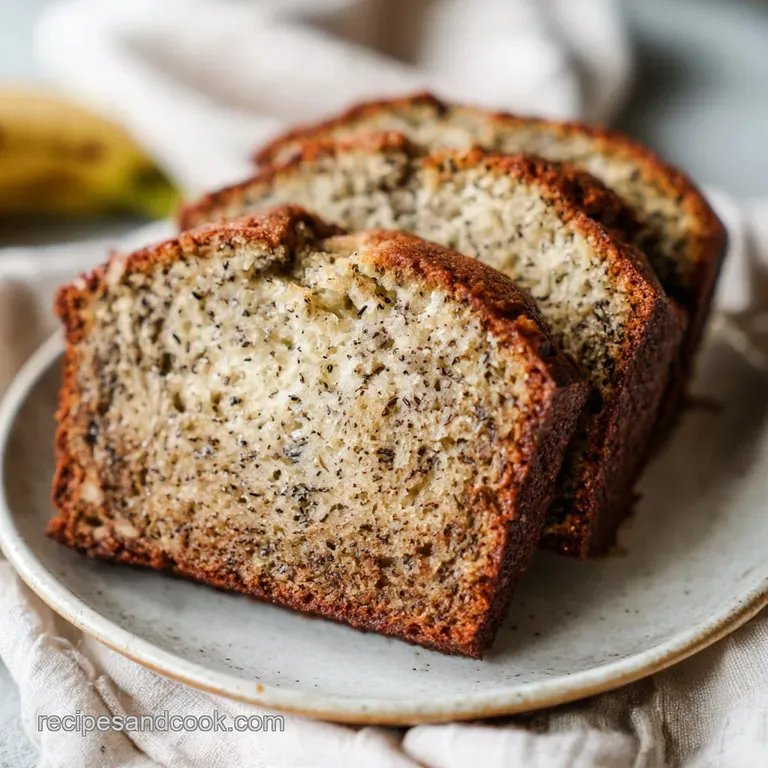
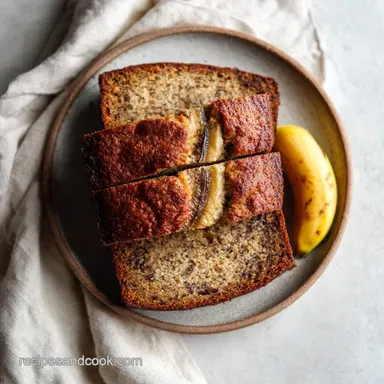
Pioneer Woman Banana Bread: Moist and Velvety
- Time: Active 15 minutes, Passive 70 minutes, Total 85 minutes
- Flavor/Texture Hook: Buttery, nut studded crumb with a soft, moist center
- Perfect for: Weekend brunch, neighborly gifts, or using up spotted fruit
- Achieving the Velvety Texture of the Pioneer Woman Banana Bread Recipe
- Important Details for a Flawless Loaf Every Single Time
- Choosing the Right Components for Your Next Favorite Bread Recipe
- Simple Kitchen Tools Required for Making this Traditional Recipe
- Mastering the Mixing Process for a Perfectly Moist Result
- Solving Common Baking Problems Before They Ruin Your Loaf
- Customizing Your Banana Bread with Traditional and Modern Twists
- Keeping Your Homemade Bread Fresh for Days of Enjoyment
- Classic Toppings and Drinks that Pair with this Recipe
- Recipe FAQs
- 📝 Recipe Card
Achieving the Velvety Texture of the Pioneer Woman Banana Bread Recipe
The smell of overripe bananas sitting on a countertop is a scent that immediately transports me back to my grandmother’s kitchen in the late 1980s. Banana bread isn't just a snack; it is a cultural icon of the resourceful home.
Historically, this dish gained massive popularity during the Great Depression in the United States. Families couldn't afford to waste a single scrap of food, and those soft, brown spotted bananas that were too mushy to eat plain became the star of a new kind of "quick bread." It was a way to turn a potential loss into a sweet, filling victory for the whole family.
Whenever I pull a warm loaf out of the oven, I think about how this pioneer woman banana bread recipe carries on that tradition of comfort and simplicity. It’s the kind of bake that makes your house feel like a home the second the butter and sugar start dancing together in the mixer.
I remember one specific Saturday when the rain was lashing against the windows and I had exactly three and a half bananas looking quite sorry for themselves. Instead of tossing them, I whipped up this batter, and the transformation from ugly fruit to a golden, fragrant masterpiece felt like a small bit of kitchen magic.
We often look for fancy techniques to make our baking stand out, but the beauty of this bread recipe lies in its reliability. It doesn't ask for much, just a bit of patience while the butter softens and a gentle hand when folding the flour.
It is a dish designed to be shared over a pot of coffee or wrapped in foil and handed to a friend who is having a rough week. That sense of connection is what baking is really about, isn't it?
Important Details for a Flawless Loaf Every Single Time
Success in baking usually comes down to understanding the "why" behind the steps. While it might seem like you can just throw everything in a bowl, there are a few reasons why this specific method produces such a superior result compared to those oily, flat loaves we've all encountered at bake sales.
- Aeration Strategy: Creaming the butter and sugar for a full 3 minutes creates tiny air pockets that allow the bread to rise without becoming heavy or leaden.
- Acidity Balance: The sour cream reacts with the baking soda to provide an immediate lift and a tenderizing effect on the gluten.
- Moisture Retention: Using mashed bananas at a "chunky applesauce" consistency ensures that every bite has pockets of fruit flavor without making the batter too liquid.
- Fat Distribution: Incorporating eggs one at a time ensures the emulsion stays stable, preventing a greasy finish on the crust.
| Method | Cook Time | Texture Outcome | Best For |
|---|---|---|---|
| Traditional Oven | 70 minutes | Deep golden crust, even crumb | The classic, reliable result |
| Stovetop (Water Bath) | 90 minutes | Pale, pudding like, very moist | High altitude or humid climates |
| Air Fryer | 45 minutes | Very thick crust, softer core | Small batches or quick fixes |
There is a significant difference between baking in a standard oven and trying to replicate this on a stovetop or in a smaller appliance. The oven provides surrounding dry heat that caramelizes the exterior sugars, giving you that "shatter" on the top crust that we all crave.
On the stovetop, you're essentially steaming the bread, which is great for moisture but lacks the complex flavor of a baked crust.
Choosing the Right Components for Your Next Favorite Bread Recipe
When you look at the ingredients for this pioneer woman banana bread recipe, you’ll notice they are mostly things you already have in the cupboard. But don't let the simplicity fool you; the quality of these items changes the game.
Use real butter, not margarine, and make sure your eggs are at room temperature so they don't seize the fat.
| Ingredient | Science Role | Pro Secret |
|---|---|---|
| Softened Butter | Provides the fat base for aeration | If it's too melted, your bread will be oily and flat |
| Full fat Sour Cream | Adds acidity and fat for tenderness | Don't use low-fat; the fat protects the crumb from drying |
| Baking Soda | Reacts with acid to create lift | Always sift it to avoid bitter "soapy" clumps in the loaf |
The foundation of the bread is the 1/2 cup (113g) of unsalted butter and 1 cup (200g) of granulated sugar. These two work together to build the structure. Then we have our liquids: 2 large eggs and 1 tsp (5ml) of pure vanilla extract.
The heart of the flavor comes from the 3.5 medium ripe bananas and the 1/2 cup (120g) of full fat sour cream. Finally, the dry structure is built with 1 1/2 cups (190g) of all purpose flour, 1 tsp of baking soda, and 1/2 tsp of salt. For that signature crunch, we fold in 1/2 cup (60g) of chopped pecans.
For the Creamed Base
The butter needs to be soft enough that your finger leaves an indentation with no resistance, but not so soft that it’s shiny or greasy. This state is crucial for holding the air bubbles you'll whip into it with the sugar.
For the Moisture Engine
The sour cream is the unsung hero here. If you’re out of sour cream, you can use full fat Greek yogurt, but the texture will be slightly tangier. It provides the fat necessary to keep the bread velvety for days.
For the Dry Structure
All purpose flour is the gold standard here. It has just enough protein to give the bread shape without making it tough. If you use bread flour, you'll end up with something more like a sandwich loaf than a cake like treat.
The Signature Crunch
Pecans offer a buttery, earthy flavor that complements the sweetness of the bananas. If you aren't a fan of pecans, walnuts are the traditional alternative, offering a slightly more bitter edge that cuts through the sugar beautifully.
| Original Ingredient | Substitute | Why It Works |
|---|---|---|
| Pecans (1/2 cup) | Walnuts (1/2 cup) | Similar fat content. Note: Slightly more bitter than pecans |
| Sour Cream (1/2 cup) | Greek Yogurt (full fat, 1/2 cup) | High acidity and fat. Note: Results in a slightly tangier flavor |
| Granulated Sugar (1 cup) | Light Brown Sugar (1 cup, packed) | Adds molasses. Note: Makes the bread darker and more moist |
If you find yourself missing an ingredient, don't panic. Baking is a science, but home cooking is about being flexible. For instance, if you're craving more depth, you might want to try adding a dash of cinnamon or even some chocolate chips. If you're looking for another comforting side to serve at your next gathering, this bread pairs surprisingly well with a savory Broccoli Casserole recipe if you're doing a full brunch spread.
Simple Kitchen Tools Required for Making this Traditional Recipe
You really don't need a professional kitchen to pull this off. In fact, a minimalist approach often leads to better results because you aren't over complicating the process. A simple 9x5-inch metal loaf pan is your best friend here.
Metal conducts heat more efficiently than glass, which helps the edges get that beautiful golden brown without overcooking the center.
You will also want a stand mixer or an electric hand mixer for the creaming stage. Doing this by hand is possible, but it takes a lot of elbow grease to get the butter and sugar truly fluffy.
A rubber spatula is also essential for the folding stage; you want to be able to scrape the bottom of the bowl to ensure no dry flour streaks remain hidden. Finally, a simple wire rack for cooling is vital.
If you leave the bread in the hot pan for too long, the steam will settle back into the loaf and make the bottom soggy.
Chef's Tip: Before you start mixing, grease your pan and then line it with a "sling" of parchment paper. Leave an inch of paper hanging over the long sides. This allows you to lift the whole loaf out easily once it has cooled for a few minutes.
Mastering the Mixing Process for a Perfectly Moist Result

- Preheat your oven to 180°C (350°F) and grease a 9x5-inch metal loaf pan. Note: Preheating is non negotiable for the immediate rise.
- In a stand mixer, beat the softened butter and granulated sugar for at least 3 minutes until the texture is pale and fluffy.
- Add the eggs one at a time, ensuring each is fully incorporated before adding the next. Note: This prevents the batter from curdling.
- Stir in the vanilla extract until combined.
- In a separate bowl, mash the bananas until they reach a chunky applesauce consistency.
- Stir the full fat sour cream into the mashed bananas until smooth.
- Sift together the all purpose flour, baking soda, and salt. Note: Sifting removes lumps and aerates the dry mix.
- Alternately fold the dry ingredients and the banana mixture into the butter base until no flour streaks remain.
- Gently fold in the chopped pecans with a spatula.
- Pour the batter into the loaf pan and bake for 65 to 75 minutes until a skewer comes out clean and the top is golden brown.
Aerating the Base
The first three minutes of mixing are the most important. You aren't just mixing; you are building the skeletal structure of the bread. If you stop too early, your bread will be dense and heavy. Watch for the color to change from yellow to a very pale cream color.
The Gentle Fold
Once the flour goes in, put the mixer away. Over mixing at this stage activates the gluten, which is great for pizza dough but terrible for banana bread. You want a tender, cake like crumb, so use a "cut and fold" motion with your spatula.
The Golden Bake
Every oven is a little different. Start checking your bread at the 60 minute mark. If the top is getting too dark but the center is still jiggly, loosely tent a piece of foil over the top. This allows the middle to finish cooking without burning the crust.
Solving Common Baking Problems Before They Ruin Your Loaf
Even the best of us have a loaf come out less than ideal sometimes. Usually, it's a small technical error that is easy to fix. The most common heartbreak is the "sunken middle," where the bread looks perfect in the oven but collapses as soon as you pull it out.
This is often caused by under baking or by opening the oven door too early, which causes a sudden drop in temperature.
Another issue is the "rubbery" texture. This almost always happens because the batter was over mixed after the flour was added. Remember, as soon as that flour hits the wet ingredients, you are on the clock. Mix only until the white streaks disappear and not a second longer. If you're looking for a simpler, perhaps faster version of this classic, you might enjoy my Classic banana bread which uses a slightly different hydration ratio.
| Problem | Root Cause | Solution |
|---|---|---|
| Sunk in Middle | Under baked or too much leavening | Use an oven thermometer; measure soda precisely |
| Dry Crumb | Too much flour or over baked | Spoon and level flour; don't scoop directly |
| Gummy Bottom | Bananas were too watery | Mash to applesauce consistency, not liquid |
Why did my banana bread sink in the middle?
A sunken center usually means the structure wasn't set before the air bubbles collapsed. This happens if your baking soda is old (it should fizz when dropped in vinegar!) or if you used too many bananas.
Stick to the 3.5 medium banana rule; adding a fifth banana adds too much weight and moisture for the flour to support.
Preventing the "Rubber" Texture
Texture is everything. If your bread feels bouncy or tough, you likely worked the gluten too hard. Next time, try mixing the dry and wet ingredients by hand with a large spoon instead of the electric mixer. It gives you much more control.
Common Mistakes Checklist:
- ✓ Ensure butter is room temp (not melted) to hold air.
- ✓ Check that baking soda is fresh for a proper rise.
- ✓ Avoid over mashing bananas into a soup.
- ✓ Do not open the oven door during the first 45 minutes.
- ✓ Let the loaf cool in the pan for exactly 10 minutes before moving.
Customizing Your Banana Bread with Traditional and Modern Twists
Once you've mastered the base pioneer woman banana bread recipe, the variations are endless. I sometimes think of this recipe as a canvas. You can keep it traditional, or you can lean into the decadence.
My kids personally love it when I swap the pecans for dark chocolate chips, creating melty pockets of cocoa in every slice.
- The Decadent Upgrade: Add 1/2 cup of semi sweet chocolate chips and a tablespoon of espresso powder to the dry ingredients. The coffee doesn't make it taste like mocha; it just makes the chocolate and banana flavors pop.
- The Harvest Twist: Swap the pecans for toasted walnuts and add 1 teaspoon of ground cinnamon and a pinch of nutmeg. This makes the loaf feel like a warm hug on a cold autumn day.
- gluten-free Adaptation: Use a high-quality 1 to-1 gluten-free flour blend. Note: The texture will be slightly grainier, but the sour cream helps maintain moisture.
- dairy-free Swap: Use vegan butter sticks and a dairy-free almond based yogurt in place of the sour cream. It won't be quite as rich, but it still tastes fantastic.
If you are cooking for a crowd, you can double this recipe, but be careful with the spices. When doubling, I usually only use 1.5 times the salt and vanilla so the flavor doesn't become overwhelming.
If you're scaling down for a small household, you can use a mini loaf pan just reduce the baking time to about 35-40 minutes.
Keeping Your Homemade Bread Fresh for Days of Enjoyment
Storage is where most people go wrong. If you wrap a warm loaf in plastic, the trapped steam will make the crust sticky and the middle soggy. Always wait until the bread is completely cool to the touch before wrapping it.
- Room Temperature
- Wrap tightly in plastic wrap or store in an airtight container for up to 4 days.
- Fridge
- You can store it in the fridge for up to a week, but the cold can dry out the crumb. I recommend a quick 10 second zap in the microwave before eating.
- Freezer
- This bread freezes beautifully. Wrap the whole loaf (or individual slices) in plastic wrap, then a layer of aluminum foil. It stays fresh for up to 3 months. To reheat, just let it thaw on the counter overnight.
Zero Waste Tip: If you have a few slices that have gone a bit too dry, don't throw them away! Banana bread makes the world's best French toast. Dip the slices in an egg and milk mixture and fry them in a bit of butter until caramelized.
Or, crumble the dry bread and use it as a topping for vanilla ice cream.
Classic Toppings and Drinks that Pair with this Recipe
While a thick slice of this bread is a meal in itself, sometimes you want to "dress it up" for guests. A simple schmear of salted butter is the gold standard, as the salt cuts through the sugar and highlights the banana flavor.
If you want to get fancy, try making a honey cinnamon butter by whipping softened butter with a drizzle of honey and a dash of cinnamon.
Salted Honey Butter
This is my go to for brunch. The floral notes of the honey mixed with flaky sea salt creates a sweet and salty contrast that makes the banana bread feel like a five star dessert.
The Morning Pairing
For the ultimate cozy morning, serve a warm slice alongside a dark roast coffee or a spicy chai tea. The tannins in the tea or the bitterness of the coffee balance the richness of the sour cream and butter perfectly.
It's the kind of breakfast that encourages you to slow down, put your phone away, and actually enjoy the moment. And isn't that what a good pioneer woman banana bread recipe is for? To bring us back to the basics of good food and good company.

Recipe FAQs
What is the number one mistake made when making banana bread?
Overmixing the batter is the biggest error. You must stop stirring the moment the flour streaks disappear to avoid developing excess gluten, which turns the crumb from velvety to tough.
Does Ina Garten have a banana bread recipe?
No, this specific recipe is associated with The Pioneer Woman. While many chefs have their own versions, this particular method relies on the specific creaming of butter and sugar for 3 minutes to achieve its signature texture.
What is the best fat to use when making banana bread?
Use softened unsalted butter exclusively. The creaming method requires solid fat to trap air, which provides the lift and structure necessary for this dense, moist loaf.
Is brown sugar or white sugar better for banana bread?
Stick to the one cup of granulated sugar listed in the official recipe. Using granulated sugar ensures the proper aeration during the 3-minute creaming stage, which is essential for the structure of this quick bread.
How to ensure the center of the loaf is fully baked?
Insert a skewer into the exact center of the loaf at the 65-minute mark. If the skewer comes out with wet batter attached, continue baking in 5-minute increments until it emerges clean, as oven temperatures can fluctuate.
How to achieve the perfect crumb structure?
Beat the butter and sugar for at least 3 minutes until pale and fluffy. If you enjoyed mastering this creaming technique, see how the same principle of emulsification creates a perfect base for our classic peanut butter cookies.
How to keep the banana bread fresh?
Wrap the cooled loaf tightly in plastic wrap and store it at room temperature. It develops better flavor after 24 hours, but consuming it within three to four days ensures the best texture.
Pioneer Woman Banana Bread
Ingredients:
Instructions:
Nutrition Facts:
| Calories | 345 kcal |
|---|---|
| Protein | 4.6 g |
| Fat | 17.1 g |
| Carbs | 45.4 g |
| Fiber | 1.5 g |
| Sugar | 25.2 g |
| Sodium | 242 mg |
