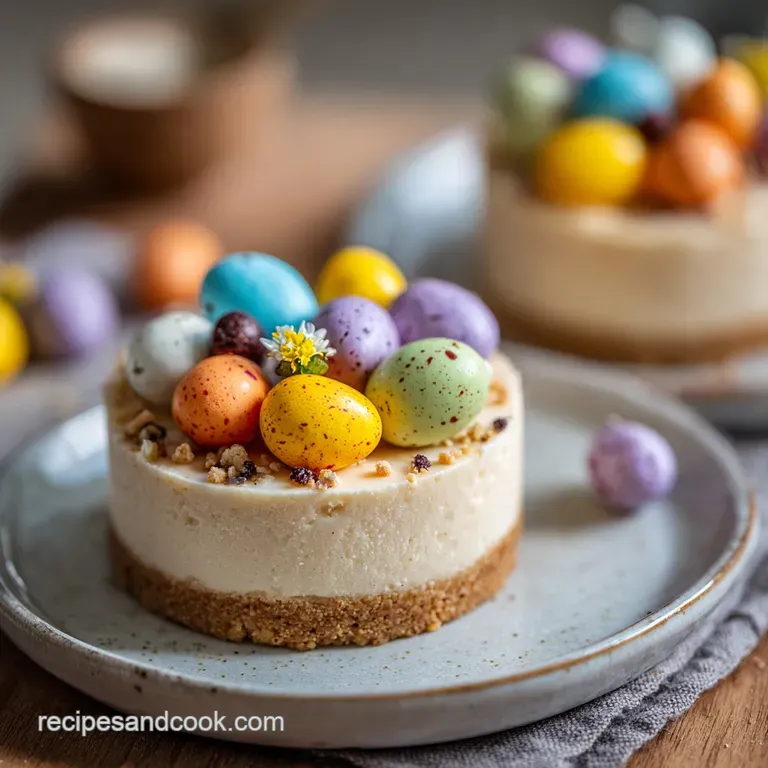
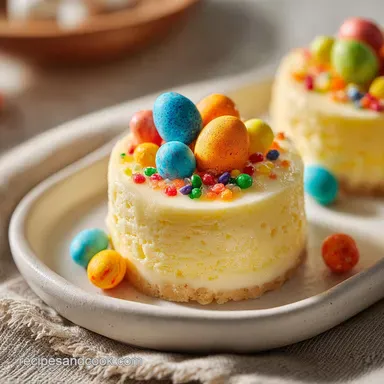
No Bake Mini Egg Cheesecake: Silky and Creamy
- Time: Active 20 minutes, Passive 240 minutes, Total 260 minutes
- Flavor/Texture Hook: Silky vanilla cream with shattering chocolate egg clusters
- Perfect for: Easter Sunday brunch or a stress free spring celebration
- Master the easy easter no bake cheesecake
- Logic Behind Velvety No Bake Fillings
- Essential Elements for Dessert Success
- Professional Tools for Bakery Results
- Constructing Layers Step by Step
- Solving Texture and Setting Issues
- Creative Twists for Unique Flavors
- Storage Solutions and Zero Waste
- Finishing Touches and Presentation Ideas
- Recipe FAQs
- 📝 Recipe Card
Master the easy easter no bake cheesecake
Imagine the sound of a metal spoon cracking through a crisp, pastel sugar shell before sinking into a cloud of vanilla cream. That first bite is a symphony of textures the buttery, salt flecked crunch of the biscuit base, the velvety smoothness of the filling, and the sudden, sweet shatter of crushed chocolate eggs.
There’s something almost therapeutic about the way the cold cream cheese yields under a knife, revealing those colorful speckles hidden inside. This is the dessert that makes people stop talking and start reaching for seconds before you've even finished clearing the plates.
I remember the first time I tried to pull off a holiday dessert without the safety net of an oven. I was terrified it would turn into a puddle the second it hit room temperature. But that’s the beauty of this specific method; it isn’t about luck, it’s about the way we handle the cream.
By treating the double cream with a little respect and folding it in with a gentle hand, we build a structure that’s both light as air and remarkably sturdy. You aren't just making a cake; you’re engineering a moment of pure, sugary joy that requires zero minutes of baking time.
Right then, let's get into why this works so well. We're skipping the gelatin because, honestly, I find it can make things rubbery if you aren't careful. Instead, we are leaning on the natural stability of full fat ingredients.
When you beat that cream cheese until it’s glossy and then introduce perfectly whipped double cream, you’re creating a stable emulsion that sets firm in the fridge. It’s foolproof, bakery worthy, and honestly? It’s a bit of a miracle.
Trust me on this once you see those clean, sharp slices come out of the pan, you’ll never go back to the baked version for Easter again.
Logic Behind Velvety No Bake Fillings
Understanding the physics of your mixing bowl makes the difference between a runny mess and a professional finish. We aren't just mixing ingredients; we are managing fat and air.
- Fat Solids Reinforcement: Using 500g of full fat cream cheese is non negotiable because the high fat content solidifies when chilled, acting as the primary "skeleton" of the cake.
- Aeration Stability: Whipping 300ml of double cream to stiff peaks traps millions of tiny air bubbles which provide lift and a mousse like mouthfeel without needing heat.
- Sugar Moisture Control: The powdered sugar absorbs excess moisture from the cream cheese, while the light brown sugar in the base provides a tacky, glue like grip for the biscuit crumbs.
- Emulsion Integration: By using room temperature cheese and chilled cream, we ensure the fats bond smoothly without curdling or losing their trapped air.
| Feature | Easy No Bake Method | Traditional Baked Method |
|---|---|---|
| Preparation Time | 20 minutes active work | 60+ minutes plus cooling |
| Texture Outcome | Silky, mousse like, and airy | Dense, custard like, and rich |
| Success Factor | Controlled aeration & chilling | Temperature precision & water baths |
Choosing the right approach depends on the vibe of your event. If you want something that feels light after a heavy lamb dinner, the no bake route is the winner. It provides that refreshing, cold contrast that a dense baked cheesecake just can't match.
Plus, the absence of eggs means you don't have to worry about cracks or over baking.
Essential Elements for Dessert Success
Selecting your components is where the magic starts. We want the best fats and the most aromatic vanilla to ensure every bite feels luxurious. This isn't the time for low-fat alternatives; we need the richness to carry the flavor of those chocolate eggs.
Ingredient Deep Dive
| Ingredient | Science Role | Pro Secret |
|---|---|---|
| Double Cream | Provides the essential air and volume | Chill your bowl and whisk for 10 mins before whipping to get stiffer peaks |
| Full Fat Cream Cheese | Creates the structural "set" of the filling | Always pat the cheese dry with a paper towel if there’s any liquid in the tub |
| Vanilla Bean Paste | Adds deep aromatic complexity | Use paste over extract to see those beautiful black speckles throughout the cream |
Shopping List & Substitutions
- 300g Digestive Biscuits: The classic choice for a sandy, buttery base. Why this? They have a neutral, wheaty flavor that balances the sweet filling.
- Substitute: Graham crackers or Biscoff cookies. Note: Biscoff will make the base significantly sweeter.
- 150g Unsalted Butter: The "glue" that holds your crust together once it hits the cold.
- Substitute: Salted butter. Note: Skip the extra pinch of salt if you do this.
- 15g Light Brown Sugar: Adds a hint of caramel and keeps the base from being too brittle.
- Substitute: Granulated sugar. Note: It won't have the same chewy, toffee like depth.
- 500g Full Fat Cream Cheese: The heart of the recipe.
- Substitute: Mascarpone. Note: It’s richer but slightly softer, so chill for an extra hour.
- 100g Powdered Sugar: Sweetens without adding any grainy texture.
- Substitute: Caster sugar. Note: You must beat it longer to ensure it fully dissolves into the cheese.
- 300ml Double Cream: Also known as heavy whipping cream.
- Substitute: Whipped topping (Cool Whip). Note: This will result in a much softer, sweeter set.
- 5ml Vanilla Bean Paste: For that premium bakery look and taste.
- Substitute: 1 tsp Vanilla extract.
- 150g Cadbury Mini Eggs: Our star attraction, crushed for the filling.
- Substitute: M&Ms or chopped chocolate bars.
- 100g Whole Mini Eggs: For the crown of the cake.
- 50g Milk Chocolate: Melted for the final, artistic drizzle.
When it comes to the base, much like a Homemade Apple Pie, the ratio of fat to starch is everything. If the base feels too dry, it will crumble away when you slice it; if it's too wet, it will stick to the pan like cement. Aim for a "wet sand" feel.
Professional Tools for Bakery Results
You don't need a kitchen full of gadgets, but a few specific items make the process seamless. Using a springform pan is non negotiable here; trying to lift a no bake cheesecake out of a standard cake tin is a recipe for heartbreak.
- 9 inch Springform Pan: This allows you to pop the sides off, leaving your masterpiece perfectly intact on the base.
- Electric Hand Mixer: Essential for getting those stiff peaks in the cream and a smooth finish on the cheese. A stand mixer works too, just don't walk away while it's running!
- Flat Bottomed Glass: This is my favorite "hack" for pressing the biscuit base. It gets into the edges and creates a perfectly level surface.
- Large Silicone Spatula: Necessary for the "cut and fold" motion. You need something flexible that won't deflate your air bubbles.
- Digital Scales: Since we're working in grams, precision is your best friend. Even 20g too much butter can make the base greasy.
| Servings | Biscuit/Butter Ratio | Cream Cheese Total | Chill Time |
|---|---|---|---|
| 6 people | 150g / 75g | 250g | 4 hours |
| 12 people | 300g / 150g | 500g | 4 hours |
| 24 people | 600g / 300g | 1kg | 6 hours |
When you're scaling up for a big party, keep in mind that larger cakes take longer to set in the center. If you double the recipe for a massive crowd, I'd suggest letting it chill overnight just to be safe. It’s better to have a firm cake than a "cheesecake dip" on the dessert table!
Constructing Layers step-by-step

- Prep the base. Pulse the 300g digestive biscuits in a processor until they look like fine sand. If you don't have a processor, put them in a zip top bag and bash them with a rolling pin it’s great stress relief!
- Bind with butter. Pour in the 150g melted unsalted butter and 15g light brown sugar. Stir until every crumb is coated and looks like dark, wet sand.
- Form the foundation. Tip the crumbs into your 9 inch springform pan. Use the flat bottom of a glass to press them down firmly. Note: Pressing hard prevents the base from falling apart later.
- Flash freeze. Pop the pan into the freezer for 10 minutes. This shocks the butter into solidifying instantly, creating a sturdy platform for the cream.
- Whip the cream. In a chilled bowl, beat the 300ml double cream until it forms stiff peaks. Note: Stop the moment the whisk leaves a trail that stays put.
- Smooth the cheese. In a separate large bowl, beat the 500g cream cheese, 100g powdered sugar, and 5ml vanilla bean paste until glossy. It should look like thick silk.
- Integrate the air. Add a large dollop of the whipped cream to the cheese and stir it in to loosen the mixture. Then, gently fold in the rest of the cream using a figure eight motion.
- Add the crunch. Toss in the 150g crushed mini eggs at the very last second. If you stir too much, the colors will bleed and turn the filling grey.
- Spread and level. Pour the filling onto the chilled base and smooth the top with a spatula or the back of a spoon.
- The long chill. Place in the fridge for at least 4 hours. Once set, decorate with the remaining 100g whole eggs and a drizzle of the 50g melted milk chocolate.
For the chocolate drizzle, a tip I learned while making my Valeria Chocolate Cream Dessert is to use a small piping bag or even just a fork to create thin, wispy lines. It makes the whole thing look much more professional than just glooping it on with a spoon!
Solving Texture and Setting Issues
The biggest hurdle with a no bake cake is the "will it or won't it" set. Usually, if it's runny, it’s a temperature or mixing issue.
Why Your Cheesecake is Runny
If you cut into your cake and it slumps over like a melting ice cream cone, the culprits are usually the cream cheese or the whipping process. Many people try to save calories by using "light" or "spreadable" cream cheese from a tub. Don't do it!
These often have a higher water content and stabilizers that prevent a firm set. Another common mistake is under whipping the cream; if the cream doesn't have enough air trapped in it, there's nothing to hold up the heavy cheese.
| Problem | Root Cause | Solution |
|---|---|---|
| Lumpy Filling | Cream cheese was too cold | Leave cheese at room temp for 2 hours before mixing |
| Soggy Base | Butter was too hot when added | Let melted butter cool for 5 mins before mixing with crumbs |
| Bleeding Colors | Crushed eggs added too early | Only fold in the candy pieces right before spreading in the pan |
Common Mistakes Checklist
- ✓ Use full fat, brick style cream cheese for the best structural integrity.
- ✓ Ensure the double cream is cold from the fridge before you start whipping it.
- ✓ Avoid over beating the cheese mixture, which can cause it to become thin.
- ✓ Give the cake the full 4 hours to set; rushing it will result in a messy slice.
- ✓ Wipe your knife with a warm, damp cloth between every single slice for bakery worthy edges.
If you find your filling is still looking a bit loose after mixing, don't panic. You can sometimes save it by gently folding in an extra 100ml of very stiffly whipped cream, but the best fix is always prevention through using the right fat percentages from the start.
Creative Twists for Unique Flavors
Once you’ve mastered the base recipe, you can start playing with the profile. This cheesecake is a blank canvas for spring flavors.
- The Zesty Spring Twist: Add the zest of two lemons and 1 tablespoon of juice to the cream cheese mixture. The acid helps the proteins in the cheese firm up even faster, and it cuts through the richness of the chocolate eggs beautifully.
- The Boozy Brunch Version: Fold in 2 tablespoons of Irish cream liqueur or white chocolate liqueur to the cheese base. Note: Reduce the vanilla paste to 2ml so the flavors don't compete.
- The Double Chocolate Threat: Swap the digestive biscuits for chocolate bourbon biscuits and add 2 tablespoons of cocoa powder to the filling. This creates a dark, moody contrast to the pastel eggs.
Adjusting the Scale
If you’re making this for just two people, you can easily halve the recipe and set it in individual ramekins or small jars. This eliminates the need for a springform pan and makes for a very cute presentation.
If you're going the other way and feeding a neighborhood, remember my 1.5x spice rule: for a double batch, only increase the vanilla and sugar by 1.5 times, otherwise, the flavor can become cloying. Also, reduce the total liquid (the cream) by about 10% to ensure the larger mass sets properly in the center.
Storage Solutions and Zero Waste
Keeping your cheesecake at its peak is all about moisture control. If left uncovered in the fridge, the cream will absorb "fridge smells" (nobody wants onion scented cheesecake) and the biscuit base will start to soften.
- Storage: Keep the cheesecake in the fridge in an airtight container for up to 3 days. The candy shells on the mini eggs will eventually start to soften and the colors might run after 24 hours, so it's best to add the garnish as close to serving as possible.
- Freezing: You can freeze the entire cheesecake (minus the garnish) for up to 1 month. Wrap it tightly in a double layer of plastic wrap and then foil. Thaw it in the fridge overnight before serving. The texture will be slightly more dense, almost like a semi freddo.
- Zero Waste: If you have leftover biscuit crumbs, don't throw them away! Toast them in a pan with a little butter and sprinkle them over yogurt or vanilla ice cream. Any leftover crushed mini eggs can be stirred into pancake batter or used as a topping for morning oatmeal.
If you end up with a few slices that have lost their "crunch," you can blitz them in a blender with a splash of milk to make the most decadent cheesecake milkshake you’ve ever tasted. It’s a trick I use whenever I have holiday leftovers that are past their aesthetic prime.
Finishing Touches and Presentation Ideas
To get those perfectly clean, sharp slices you see in bakeries, there’s a specific technique. Take a tall jug of boiling water and dip your long, sharp knife into it. Wipe the blade dry, make one clean cut through the cake (all the way through the base), and then clean the knife again.
Repeating this for every single cut ensures that the white filling doesn't get dragged down into the dark base, keeping those layers distinct and beautiful.
For the garnish, I like to pile the whole mini eggs in the center to look like a little bird's nest. You can even use a vegetable peeler to create chocolate curls from a block of dark chocolate to represent the "twigs" of the nest.
It takes about two minutes but adds a level of sophistication that makes people think you spent all morning on it. Serve it on a chilled white platter to make the pastel colors of the eggs really pop.
Ultimately, this easy easter no bake cheesecake is about making the holiday feel special without the stress of complicated baking. It’s approachable, foolproof, and guaranteed to be the star of your table. Right then, grab your whisk and let's get to work you've got a crowd to impress!

Recipe FAQs
Can I use light cream cheese instead of full fat?
No, avoid light cream cheese. You need the high fat content of full fat brick style cream cheese to provide the structural integrity required for a firm, stable cheesecake.
How to ensure the cheesecake sets firmly?
Chill the cheesecake for at least 4 hours. Rushing this step is a common mistake that leads to a loose, messy slice rather than a clean cut.
How to get clean slices when serving?
Wipe your knife with a warm, damp cloth between every single slice. This simple action prevents dragging and ensures you get those sharp, bakery worthy edges on every piece.
Is it true I can store the fully decorated cheesecake for several days?
No, this is a common misconception. While the cheesecake lasts 3 days in an airtight container, the candy shells on the mini eggs soften and colors begin to run after 24 hours, so garnish just before serving.
How to achieve the perfect texture in the filling?
Fold the whipped cream into the cheese mixture using a gentle 'cut and fold' motion. If you enjoyed mastering this aeration technique to keep the filling light, you can apply the same folding principle to our stuffed french toast batter for a fluffier result.
How to fix a loose or runny cheesecake filling?
Check your whipping technique first. Ensure your double cream is cold straight from the fridge before whipping to stiff peaks, as warm cream will not provide the necessary structure to stabilize the filling.
How to prevent the biscuit base from crumbling?
Press the crumb mixture firmly into the pan using the bottom of a flat glass. This compresses the butter and sugar thoroughly, creating a solid foundation that stays together when you slice it.
No Bake Mini Egg Cheesecake
Ingredients:
Instructions:
Nutrition Facts:
| Calories | 588 kcal |
|---|---|
| Protein | 5.6g |
| Fat | 43.9g |
| Carbs | 42.7g |
| Fiber | 0.8g |
| Sugar | 28.4g |
| Sodium | 345mg |
