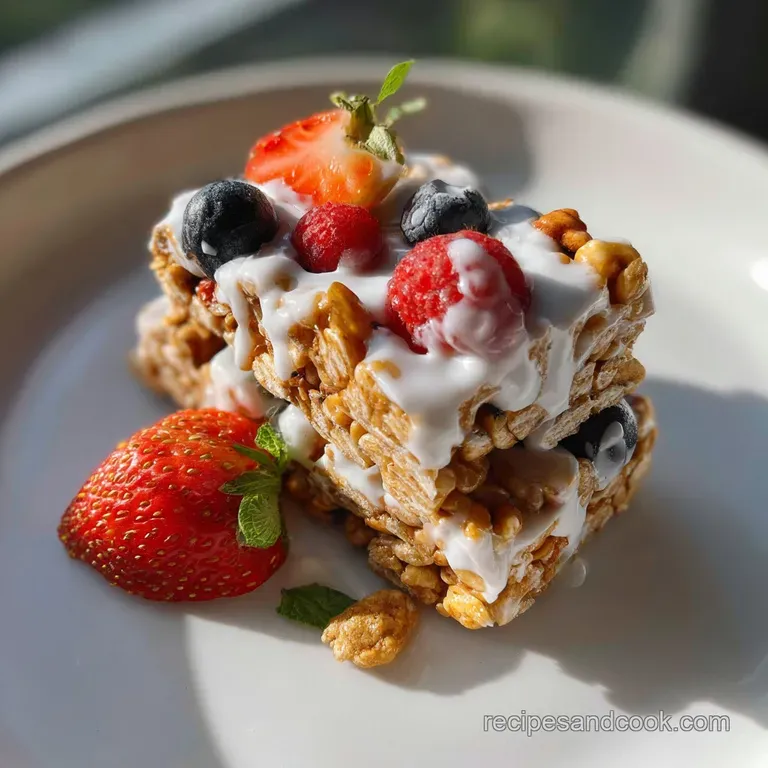
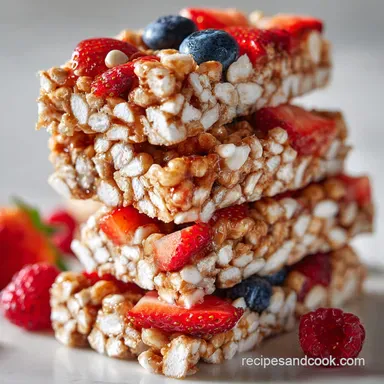
No Bake Cereal Bar Recipe
- Time: Active 10 minutes, Passive 1 hours 15 mins, Total 1 hours 25 mins
- Flavor/Texture Hook: A shatter crisp crunch followed by a velvety, honey sweetened finish.
- Perfect for: Stress free meal prep, school lunchboxes, or a quick afternoon pick me-up.
- Handcrafted Comfort with This Easy Cereal Bar Recipe
- The Physics of the Sticky Bind
- Selecting Elements for a Harmonious Crunch
- Ingredients for Your Kitchen Pantry
- Tools for Crafting Handheld Snacks
- From Prep to Plate: Step-by-Step
- Fixing Flaws and Avoiding Disasters
- Adjusting Batch Sizes for Any Crowd
- Debunking Ancient Kitchen Lore
- Freshness Guidelines and Zero Waste Tips
- Pairings and Creative Flavor Adjustments
- Recipe FAQs
- 📝 Recipe Card
Handcrafted Comfort with This Easy Cereal Bar Recipe
The kitchen smells like a warm hug right now. There is something about the way raw honey and creamy peanut butter swirl together in a saucepan that just feels like home. It reminds me of those Saturday mornings when the sun would hit the linoleum floor and I would sit there with a bowl of cereal, trying to catch every last bit of the sugary milk at the bottom.
I used to buy the pre packaged versions, thinking they were a convenient shortcut, but honestly, they always tasted a bit like cardboard and regret. After a few sticky fingered experiments and one memorable disaster involving a burnt pot of honey, I finally landed on this version.
It is the kind of recipe you make once and then realize you can never go back to the store-bought stuff again.
We are going for a texture that is dense enough to hold its shape but soft enough to yield when you take a bite. It is a delicate balance between the dry crunch of the cereal and the liquid gold that binds it all together.
Trust me on this: once you see the way the chocolate chips slightly melt into the crevices of the oats, you will be hooked. Let's crack on with the details.
The Physics of the Sticky Bind
Sugar Recrystallization: When we heat the honey and coconut oil, we create a supersaturated solution that, once cooled, acts as a structural adhesive to keep the bars from crumbling.
Lipid Emulsification: The fats in the peanut butter and coconut oil combine to create a velvety barrier around the cereal, preventing the moisture from the honey from making everything soggy.
Fiber Absorption: The rolled oats and chia seeds act as tiny sponges, soaking up the liquid binder to ensure the bars remain chewy rather than brittle.
| Method | Time | Texture | Best For |
|---|---|---|---|
| The Stovetop Melt | 5 minutes | Chewy and pliable | Traditionalists seeking classic comfort |
| Microwave Shortcut | 2 minutes | Softer, more delicate | Quick weeknight snacking emergencies |
| The Cold Press | 0 minutes | Extremely dense | High fat, raw ingredient enthusiasts |
Choosing the right method depends on how much time you have and how "solid" you want your final snack to be. For this specific cereal bar recipe, I always advocate for the stovetop because the gentle heat allows the honey to marry with the fats in a way that the microwave just can't replicate.
It is a small extra step that makes a massive difference in how the bar feels when you bite into it.
Selecting Elements for a Harmonious Crunch
| Component | Science Role | Pro Secret |
|---|---|---|
| Raw Honey | Primary Adhesive | Heat it just until it bubbles to activate its binding properties without scorching. |
| Coconut Oil | Temperature Regulator | Use extra virgin for a subtle nutty aroma that complements the toasted oats perfectly. |
| Vanilla Bean Paste | Flavor Depth | The tiny flecks of bean provide a visual cue of quality and a much deeper scent than extract. |
| Flaky Sea Salt | Flavor Contrast | Add this at the very end to prevent it from dissolving, giving you little pops of saltiness. |
You might be tempted to swap out the honey for maple syrup, but be careful. Honey has a higher viscosity and a specific type of sugar structure that makes it a much better "glue" for no bake treats. If you do use maple, you will likely end up with a pile of very delicious granola instead of a sturdy bar.
It is a trade off I have learned the hard way more than once.
Ingredients for Your Kitchen Pantry
- 3 cups (90g) Toasted O style cereal or crisp rice cereal: The backbone of the bar. Why this? Provides the essential "shatter" texture that makes the bar feel light. (Substitute: Cornflakes for a more rustic, jagged crunch)
- 1 cup (90g) Old-fashioned rolled oats: Adds chew and heartiness. Why this? Keeps the bars from being too airy or sweet. (Substitute: Quick oats if you prefer a less noticeable texture)
- 1/2 cup (30g) Shredded unsweetened coconut: Natural sweetness and fat. Why this? Adds a tropical note without overpowering the peanut butter. (Substitute: Finely chopped sunflower seeds)
- 1/2 cup (125g) Creamy natural peanut butter: The flavor anchor. Why this? High fat content ensures a velvety mouthfeel. (Substitute: Almond butter or cashew butter)
- 1/2 cup (170g) Raw honey: The liquid gold binder. Why this? Superior stickiness compared to other liquid sweeteners. (Substitute: Brown rice syrup for a vegan friendly option)
- 1/4 cup (55g) Coconut oil: Helps the bars set firm in the fridge. Why this? Solidifies at cool temperatures to hold everything together. (Substitute: Unsalted butter for a richer, dairy forward taste)
- 1 tsp (5g) Vanilla bean paste: Aromatic finish. Why this? Provides a more intense flavor than liquid extract. (Substitute: 2 tsp pure vanilla extract)
- 1/2 tsp (3g) Flaky sea salt: Essential for balance. Why this? Cuts through the sugar to make the flavors pop. (Substitute: Fine table salt, but use only 1/4 tsp)
- 1/4 cup (40g) Mini dark chocolate chips: The indulgence factor. Why this? Minis distribute better so you get chocolate in every single bite. (Substitute: Cacao nibs for a less sweet, crunchy alternative)
- 2 tbsp (20g) Chia seeds: Extra fiber and "crunch." Why this? They expand slightly when they hit the honey, adding structural integrity. (Substitute: Ground flaxseeds)
Tools for Crafting Handheld Snacks
You don't need a high tech kitchen to make this happen, but a few specific tools will save you a world of sticky frustration. First, a heavy bottomed saucepan is vital. Thin pots distribute heat unevenly and can lead to the honey scorching before the peanut butter is even melted.
Second, grab a 9x9 inch square baking pan. I prefer metal over glass here because the sharp corners make for more uniform bars.
Chef's Tip: Line your pan with parchment paper, leaving an overhang on two sides. This "sling" allows you to lift the entire block out for easy slicing once it has set.
Also, find a sturdy silicone spatula. A wooden spoon works, but the silicone is much easier to clean when dealing with honey and peanut butter. If you find the mixture sticking to your hands during the pressing stage, keep a small bowl of water nearby to dampen your fingertips.
It is a simple trick that keeps you from becoming part of the recipe yourself.
From Prep to Plate: step-by-step

- Line a 9x9 inch pan with parchment paper, ensuring there is a slight overhang for easy removal later.
- Combine cereal, oats, coconut, and chia seeds in a large mixing bowl, tossing gently to distribute the smaller seeds.
- Melt the peanut butter, honey, and coconut oil in a saucepan over medium low heat. Cook 3-5 mins until the mixture begins to bubble gently at the edges.
- Remove from heat immediately and stir in the vanilla bean paste and sea salt. Note: Adding vanilla to a boiling liquid can cause the flavor to evaporate, so wait until it is off the burner.
- Pour the liquid mixture over the dry ingredients and fold together using a silicone spatula. Stir until every piece of cereal is shimmering and coated.
- Allow the mixture to cool for 5 minutes before adding the mini chocolate chips. Note: If you add them too soon, they will melt completely into a muddy brown mess instead of remaining as distinct chips.
- Transfer the mixture to your prepared pan, spreading it out into the corners.
- Press the mixture down firmly using the back of a measuring cup or a flat spatula. Apply heavy pressure until the surface is flat and compact.
- Refrigerate for at least 1 hours until the bars feel solid to the touch.
- Lift the parchment sling out of the pan and slice into 12 even rectangles using a sharp chef's knife.
Fixing Flaws and Avoiding Disasters
The most common issue I hear about with any cereal bar recipe is the "crumble factor." If your bars are falling apart as soon as you touch them, it usually comes down to two things: heat or pressure. If the honey didn't get hot enough, it won't set into that firm glue we need.
On the flip side, if you were too gentle when pressing the mixture into the pan, the air pockets will cause the bars to disintegrate.
Why Your Bars Are Too Sticky
This usually happens if the honey wasn't boiled long enough or if the ratio of liquid to dry was a bit off. If they feel like taffy, try putting them in the freezer for 20 minutes before slicing. This will firm up the coconut oil and honey, making them much easier to handle.
Avoiding the Dry Patch Syndrome
If you see white patches of dry oats or cereal, you haven't folded the mixture thoroughly. It takes a bit of muscle to make sure that heavy peanut butter mixture reaches the bottom of the bowl. Always scrape the bottom and sides multiple times.
| Problem | Root Cause | Solution |
|---|---|---|
| Bars are falling apart | Insufficient compression | Press harder next time; use a heavy weight while cooling. |
| Mixture is too runny | Honey didn't reach a boil | Return to the pan and heat until large bubbles appear. |
| Chocolate is a smear | Mixture was too hot | Wait until the bowl feels warm, not hot, before adding chips. |
Common Mistakes Checklist
- ✓ Don't skip the parchment paper - honey is a natural glue and will bond to your pan forever.
- ✓ Ensure you use "natural" peanut butter where the only ingredients are peanuts and salt for the best texture.
- ✓ Check that your cereal is fresh; stale cereal will make the bars taste dusty and soft.
- ✓ Never skip the cooling period in the fridge - it is essential for the coconut oil to solidify.
- ✓ Use a damp knife to slice the bars to prevent the honey from dragging and tearing them.
Adjusting Batch Sizes for Any Crowd
If you are making these for a big bake sale or a family reunion, doubling the recipe is straightforward. However, don't just toss twice the ingredients into a small bowl. Use a large stockpot to mix everything so you have enough room to fold without crushing the cereal.
When doubling, a 9x13 inch pan is your best friend.
For a smaller batch (say, for just one person's week of snacks), you can easily halve the ingredients. Use a standard loaf pan to keep the bars thick. If you put a half batch into a 9x9 pan, they will be thin and prone to breaking.
Just remember that smaller volumes of honey and peanut butter will melt much faster, so keep a close eye on that saucepan to avoid burning.
Similar to the technique used in our Back to School recipe, the key is maintaining the ratio of binders to solids. If you feel like your mixture is too wet after scaling, add a handful of extra oats. It is much easier to fix a wet mixture than a dry one once the honey has cooled down.
Debunking Ancient Kitchen Lore
One of the biggest myths is that you have to use marshmallows to get a good cereal bar. While those are great for a classic rice treat, honey and peanut butter provide a much more sophisticated flavor profile and a better "chew" that doesn't leave your teeth feeling like they are covered in sugar.
You don't need corn syrup or stabilizers to get a bar that holds up in a lunchbox.
Another misconception is that oats must be cooked to be digestible or tasty. In this cereal bar recipe, the raw rolled oats soften perfectly as they sit with the warm honey and oil. They provide a structural "toothiness" that you just can't get from cereal alone. It is very similar to the texture in my Oatmeal Peanut Butter Bars recipe, where the oats are the star of the show.
Freshness Guidelines and Zero Waste Tips
Storage: Keep these bars in an airtight container in the refrigerator for up to 1 week. Because of the coconut oil and honey, they will soften significantly at room temperature, so it is best to pull them out right before eating.
If you are packing them in a lunch, use an insulated bag with a small ice pack to keep the chocolate from smearing.
Freezing: These freeze beautifully! Wrap individual bars in parchment paper and place them in a freezer safe bag. They will stay fresh for up to 3 months. You can even eat them straight from the freezer for a very firm, chilled snack on a hot day.
Zero Waste: Don't throw away the crumbs at the bottom of the pan! Those little bits of honey coated oats and chocolate are absolute gold. Sprinkle them over a bowl of Greek yogurt or use them as a topping for a scoop of vanilla ice cream. If you have extra cereal that didn't fit in the bars, you can toast it with a bit of cinnamon and use it as a base for a Crunchy Homemade Granola recipe.
Pairings and Creative Flavor Adjustments
While this cereal bar recipe is a powerhouse on its own, you can easily tweak it to fit your mood. If you want a more "grown up" version, try adding 1/2 teaspoon of espresso powder to the honey mixture; it deepens the chocolate flavor and adds a subtle roasted note.
For a brighter, more morning focused bar, swap the chocolate chips for dried cranberries and add a tablespoon of orange zest.
If you are looking for a more decadent dessert vibe, you might enjoy the layers found in a Seven Layer Bars recipe. However, for a daily snack that feels a bit lighter, sticking to this oat and honey base is the way to go. You can even drizzle the finished bars with a bit of extra melted dark chocolate and a dusting of coarse salt for a professional finish that looks like it came from a boutique bakery.
Finally, consider the beverage pairing. These bars are quite rich and sweet, so they pair perfectly with a cold glass of almond milk or a strong, bitter cup of black coffee. The salt in the bars highlights the nuttiness of the drink, creating a balanced snack experience that is hard to beat.
Honestly, once you start experimenting with the add ins maybe some chopped pretzels or a dash of pumpkin spice this will become your go to kitchen project. Enjoy the process and the inevitable sticky fingers!

Recipe FAQs
What ingredients are in cereal bars?
Oats, cereal, a liquid sweetener, and fat are essential. You need a dry base (like oats and cereal), a binder (usually honey or syrup), and a fat (like coconut oil or peanut butter) to hold it all together for a chewy texture.
How to make your own cereal bars?
Gently heat the liquid sweetener and fat until just bubbling at the edges. Pour this hot binder over your dry ingredients (cereal, oats), mix until fully coated, press firmly into a lined pan, and chill until solid.
How do cereal bars stick together?
They stick together via sugar recrystallization upon cooling. The honey or syrup creates a supersaturated solution when heated, which then hardens as it cools, acting as a strong structural adhesive for the dry ingredients.
What to include in a cereal bar?
Include a mix of crunchy, chewy, and flavorful elements. For texture, use a combination of crisp rice cereal and rolled oats; for flavor, ensure you balance the sweetness with salt and vanilla.
Should I use maple syrup instead of honey for binding?
No, honey is significantly better for firm, no-bake binding. Honey has a higher viscosity and sugar structure that sets firmer upon cooling; maple syrup tends to leave the bars too soft or sticky, similar to the results you might get if you don't manage the fat content in our Chewy Classic Peanut Butter Cookies: The Chewy, Criss Cross Classic Recipe.
Is it true I must use a low-sugar binder for healthier bars?
No, this is a common misconception when using no-bake methods. Sugar is the primary structural component; reducing it too much results in bars that crumble because there is no chemical agent left to solidify the mixture when chilled.
How can I ensure the chocolate chips don't completely melt during mixing?
Stir the chocolate chips in only after the mixture has cooled slightly off the heat. Wait about five minutes after removing the binder from the stove before folding in the chips to preserve their shape and distinct texture.
No Bake Cereal Bar Recipe
Ingredients:
Instructions:
Nutrition Facts:
| Calories | 243 kcal |
|---|---|
| Protein | 4.7 g |
| Fat | 13.5 g |
| Carbs | 28.7 g |
| Fiber | 2.1 g |
| Sugar | 16.2 g |
| Sodium | 115 mg |
