Joanna Gaines Chili: a Hearty Homemade Dinner
- Time: Active 15 minutes, Passive 120 minutes, Total 135 minutes
- Flavor/Texture Hook: Savory, thick, and velvety with a mild, earthy spice profile.
- Perfect for: Cozy Sunday family dinners or game day gatherings.
- Why Simmering Uncovered Creates a Thick Texture
- Analyzing the Key Elements of the Dish
- Ingredients and Smart Substitutes for Your Pot
- Selecting the Right Tools for Slow Cooking
- Transforming Simple Pantry Staples into Dinner
- Solving Texture Issues and Flavor Imbalances
- Scaling the Recipe for Any Sized Crowd
- Flavor Twists for Different Palates
- Keeping Leftovers Fresh and Reducing Kitchen Waste
- Perfect Toppings and Beautiful Serving Ideas
- Recipe FAQs
- 📝 Recipe Card
Why Simmering Uncovered Creates a Thick Texture
The magic of this specific gaines chili recipe lies in a few key mechanical choices that happen inside that Dutch oven. Most people make the mistake of simmering chili with a lid on, thinking they are "trapping the flavor." In reality, they are trapping steam, which falls back into the pot and keeps the chili thin.
By leaving the lid off, we allow for evaporation, which concentrates the flavors and thickens the sauce.
The Starch Bridge: The liquid from the Ranch Style beans contains dissolved starches that act as a natural emulsifier, binding the water and fats together.
Maillard Foundation: Searing the beef undisturbed for 3 to 4 minutes creates a dark crust (the fond) which provides the primary savory depth for the entire pot.
Gentle Reduction: A two hour simmer allows the stewed tomatoes to break down and the water to evaporate, resulting in a velvety consistency rather than a watery one.
| Thickness | Internal Temp | Rest Time | Visual Cue |
|---|---|---|---|
| 1 inch (Beef) | 160°F (Finished) | 5 mins | No pink remains in the crumbles |
| N/A (Liquid) | 212°F (Boil) | N/A | Large bubbles breaking the surface |
| Reduced (Final) | N/A | 10 mins | Chili coats the back of a spoon |
When you see that the liquid has reduced and the color has shifted from a bright tomato red to a deep, dark brick red, you know you’ve reached the finish line. The starch from those beans is doing the hard work for you. If you’re curious about how other staples behave in the kitchen, you might want to see how the fats work in my Buttermilk Biscuits recipe to get that perfect flaky rise. It’s all about managing moisture and temperature to get the result you want.
Analyzing the Key Elements of the Dish
When we look at the components of this chili, it’s clear that Joanna Gaines chose these specific items for their reliability and traditional flavor profiles. Using 80/20 beef is non negotiable here because that fat is where the flavor lives, and it helps to sauté the onions later.
| Ingredient | Science Role | Pro Secret |
|---|---|---|
| Ground Beef (80/20) | Fat & Protein Source | Let it sit untouched to brown; don't stir too early or it will steam. |
| Ranch Style Beans | Starch & Seasoning | The "pot liquor" in the can is pre seasoned and creates the velvety body. |
| Stewed Tomatoes | Acid & Texture | These are sweeter than diced tomatoes and melt into the sauce over two hours. |
| Cumin & Chili Powder | Aromatic Depth | Toasting these briefly in the beef fat wakes up the volatile oils. |
The choice of stewed tomatoes is actually a brilliant shortcut. Because they are already cooked with seasonings like celery and bell peppers, they bring a complexity that plain canned tomatoes just can't match.
Ingredients and Smart Substitutes for Your Pot
Before you head to the store, check your pantry for these essentials. This is a very approachable list, which is part of why it's one of the most popular Magnolia Table recipes. It relies on items that have a long shelf life but deliver a high-quality finish.
- 1 lb ground beef: I suggest an 80/20 lean to fat ratio. Why this? The fat provides the necessary oil to sauté the aromatics and adds essential richness.
- 1 large white onion: Finely diced. Why this? White onions have a sharp bite that mellows perfectly during the long two hour simmer.
- 2 cloves garlic: Freshly minced. Why this? Garlic provides a foundational savory note that dried powder simply cannot replicate.
- 2 cans (15 oz each) Ranch Style beans: Keep them undrained. Why this? These are the "secret weapon" for thickness and that specific Texas style flavor profile.
- 1 can (14.5 oz) stewed tomatoes: These add a hint of sweetness. Why this? Their soft texture ensures they break down completely into the sauce.
- 1 can (8 oz) tomato sauce: For a smooth base.
- 1 cup water: To give the chili room to reduce.
- 1 tsp chili powder: The primary spice.
- 0.5 tsp ground cumin: For that earthy, smoky aroma.
- 0.5 tsp garlic salt: To season throughout.
- 0.25 tsp black pepper: For a subtle back of-the throat heat.
| Original Ingredient | Substitute | Why It Works |
|---|---|---|
| Ground Beef (80/20) | Ground Turkey (93/7) | Lower fat. Note: Add 1 tbsp oil to sauté onions as turkey is very lean. |
| Ranch Style Beans | Pinto Beans + 0.5 tsp smoked paprika | Similar texture. Note: Won't have the exact spice blend of the original. |
| Stewed Tomatoes | Diced Tomatoes + pinch of sugar | Similar acid. Note: Texture will be chunkier; sugar balances the canned tang. |
It is important to remember that if you swap the beef for a leaner meat, you might lose some of that velvety mouthfeel. The fat in the beef helps to carry the spices across your palate. If you’re looking for other ways to use these pantry staples, you might find my Honey Mustard Sauce useful for game day appetizers alongside this chili.
Selecting the Right Tools for Slow Cooking
You don't need a high end kitchen to make this, but a few specific tools will make the process much smoother. Using the right pot is probably the most important decision you'll make before you even turn on the burner.
- Large Dutch Oven: A heavy bottomed pot, like a Lodge cast iron or Le Creuset, is best. The thick walls hold heat steadily, which is vital for a 120 minutes simmer. It prevents the bottom from scorching while the top stays warm.
- Wooden Spoon or Sturdy Spatula: You need something with a flat edge to scrape the brown bits (the fond) off the bottom of the pot. This is where the flavor lives!
- Sharp Chef's Knife: For finely dicing that large white onion. You want the pieces small so they basically disappear into the finished sauce.
- Can Opener: Simple, but you'll be opening four different cans for this recipe.
| Fresh Approach | Shortcut Method | Difference |
|---|---|---|
| Freshly toasted/ground cumin | Pre ground cumin powder | Fresh is more pungent but powder is perfectly fine for a classic chili. |
| Slicing fresh jalapeños | Using canned stewed tomatoes | Canned tomatoes provide a more consistent, mellow acid profile. |
| Dry beans (soaked) | Canned Ranch Style beans | Cans save 12 hours of soaking and provide the necessary thick liquid. |
Using the right equipment ensures that the heat is distributed evenly. A thin, cheap pot will often have "hot spots" that can burn the beans before the two hours are up. If you have a choice, go with the heaviest pot you own.
Transforming Simple Pantry Staples into Dinner

Now we get to the fun part. The smell of this cooking is honestly one of my favorite things in the world. It’s that traditional, homey aroma that makes everyone gravitate toward the kitchen. Follow these steps carefully to ensure your beef has the right texture and your sauce has that velvety finish.
- Set a large Dutch oven over medium high heat. Add the ground beef and cook undisturbed for 3–4 minutes until a dark, savory crust develops. Note: Resist the urge to stir! This browning is where the flavor foundation is built.
- Break the browned beef into small crumbles using your wooden spoon.
- Lower the heat to medium. Add the finely diced onions directly to the beef fat. Sauté for about 5 minutes until the onions are translucent. This process deglazes the pot naturally.
- Stir in the minced garlic. Cook for 30 seconds until the aroma hits you. Do not let the garlic turn brown or it will become bitter.
- Pour in the two cans of undrained Ranch Style beans. Note: Do not rinse these! That liquid is essential for the final texture.
- Add the stewed tomatoes, tomato sauce, and one cup of water.
- Stir in the chili powder, ground cumin, garlic salt, and black pepper. Stir well to make sure the spices are fully incorporated.
- Bring the pot to a gentle boil, then immediately reduce the heat to low.
- Simmer uncovered for 2 hours (120 minutes). Note: Stir occasionally, about every 20 minutes, to ensure nothing is sticking to the bottom.
- Remove from heat and let the chili rest for 5–10 minutes until the liquid has settled and thickened.
The "uncovered" part is the most critical instruction here. If you cover the pot, you'll end up with a watery mess. We want the steam to escape so the flavors can concentrate. By the time the two hours are up, the stewed tomatoes should have almost completely dissolved, and the bean liquid should have transformed into a rich, silky gravy that clings to the beef.
Solving Texture Issues and Flavor Imbalances
Even the best cooks run into a hitch now and then. Chili is a living thing on the stove, and sometimes the heat is a bit too high or the meat is a bit too lean. Don't panic! Most issues are easily fixed with a quick adjustment.
Why Your Chili Is Too Thin
If you’ve simmered for two hours and it still looks like soup, it usually means your "low" heat was a bit too low, or you accidentally used drained beans. The easiest fix is to mash a few of the beans against the side of the pot with your spoon. This releases more starch into the liquid and thickens it instantly.
You can also simmer for another 15 minutes on medium low, stirring constantly to prevent burning.
Why the Beef Feels Tough
This usually happens if the meat was boiled rather than seared. If you throw the beef in and immediately start stirring, it releases its juices and boils in its own liquid. This makes the protein fibers tight and rubbery. Next time, make sure the pan is hot and leave it alone for those first 4 minutes.
For now, a long, slow simmer is the only way to help those fibers relax again.
| Problem | Root Cause | Solution |
|---|---|---|
| Bitter Aftertaste | Scorched garlic or spices | Add a teaspoon of brown sugar to balance the bitterness. |
| Excessive Grease | High fat beef (70/30) | Skim the orange oil off the top with a large spoon before serving. |
| Bland Flavor | Not enough salt or acid | Add a squeeze of lime juice or a tiny splash of apple cider vinegar. |
Common Mistakes Checklist
- ✓ Don't Drain the Beans: That liquid is your thickener.
- ✓ Avoid "Lean Only" Beef: 90/10 or 95/5 beef often results in a dry, crumbly texture.
- ✓ Don't Rush the Simmer: Two hours is the sweet spot for the flavors to meld and the tomatoes to break down.
- ✓ Use a Heavy Pot: Thin pots will burn the bottom before the chili is done.
- ✓ Check Your Spices: If your chili powder has been in the cabinet since the last eclipse, it won't have any flavor.
Scaling the Recipe for Any Sized Crowd
If you’re hosting a big game day party or just cooking for two, you can easily adjust this joanna gaines chili recipe. However, keep in mind that liquids and spices don't always scale linearly.
Downsizing (1/2 Batch): If you only want 3 4 servings, use 0.5 lb of beef and one can of beans. You should use a smaller pot (like a 3 quart saucepan) to ensure the liquid doesn't evaporate too quickly. Reduce the water to 1/3 cup.
The cook time remains roughly the same, but check it at the 90 minute mark to ensure it hasn't become too thick.
Upsizing (Double Batch): For a crowd of 14, double the beef, beans, and tomatoes. However, do not double the water or spices exactly. Use 1.5 cups of water instead of 2, and start with 1.5x the spices. You can always add more salt or chili powder at the end, but you can't take it out!
Use a very large stockpot and be prepared to stir more frequently, as the weight of the ingredients can cause the bottom to scorch.
Decision Shortcuts: If you want Maximum Thickness, mash half a can of the beans before adding them. If you want More Heat, add a finely diced jalapeño with the onions. If you want A Smoky Note, swap half the chili powder for smoked paprika.
Flavor Twists for Different Palates
While the classic Magnolia Table chili is perfect on its own, sometimes you want to shake things up. Joanna Gaines herself has variations, like her famous white chicken chili. It's easy to pivot this recipe if you're looking for something a little different while keeping the same comforting soul.
The White Chicken Chili Pivot: Swap the ground beef for shredded rotisserie chicken and the Ranch Style beans for Great Northern beans. Use chicken broth instead of water and add a small can of diced green chilis.
It’s a completely different flavor profile but uses the same "undrained bean" technique for thickness.
The Spicy Magnolia Version: If you find this version a bit too mild, don't just dump in more chili powder. Instead, dice up a fresh jalapeño (remove the seeds for less heat) and sauté it with the onions.
You can also add a pinch of cayenne or a tablespoon of canned chipotle peppers in adobo for a deep, smoky burn.
The Veggie Heavy Swap: If you want to stretch the meat further, add a diced bell pepper and a cup of frozen corn in the last 30 minutes of simmering. The corn adds a nice pop of sweetness that contrasts well with the earthy cumin. If you’re serving a crowd with various tastes, having a Jalapeno Cornbread on the side is the absolute classic pairing that everyone loves.
Keeping Leftovers Fresh and Reducing Kitchen Waste
One of the best things about this chili recipe is that it actually tastes better the next day. As it sits in the fridge, the spices continue to hydrate and the flavors marry together in a way they just can't do in the first hour.
- Fridge
- Store in an airtight container for up to 4 days. The fat may solidify on top; just stir it back in during reheating.
- Freezer
- This chili freezes beautifully! Put it in a freezer safe bag, squeeze out the air, and lay it flat. It will stay good for up to 3 months.
- Reheating
- Reheat on the stove over low heat. You might need to add a tablespoon of water or beef broth to loosen it up, as the starches will continue to thicken as it cools.
Zero Waste Tips: Don't throw away that little bit of leftover chili that isn't quite enough for a full meal! It makes an incredible topping for baked potatoes or a "chili mac" by tossing it with some elbow macaroni and extra cheddar cheese.
If you have leftover onions or garlic, dice them up and freeze them in an ice cube tray with a little olive oil for your next sauté. Even the beef fat you skimmed off the top can be used to fry eggs the next morning for a savory, smoky breakfast.
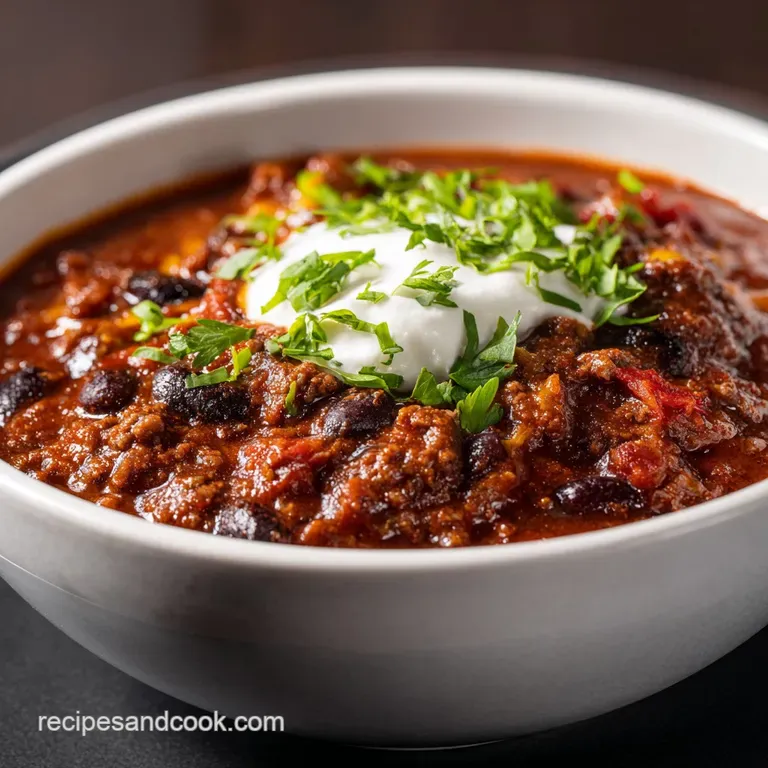
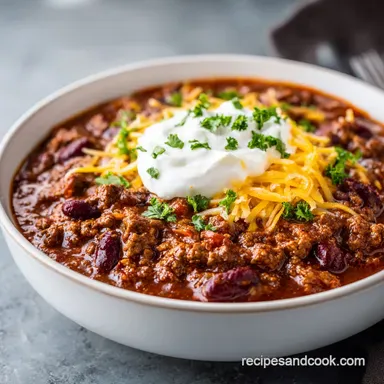
Perfect Toppings and Beautiful Serving Ideas
The way you present this chili can turn a simple weeknight meal into a special occasion. Since the chili itself is dark and rich, you want toppings that provide contrast in both color and texture. Think bright greens, creamy whites, and something with a bit of a crunch.
- Sharp Cheddar Cheese
- Finely shredded so it melts instantly.
- Sour Cream
- A dollop helps to cut through the richness of the beef.
- Fresh Cilantro
- For a pop of color and a fresh, citrusy finish.
- Fritos or Tortilla Chips
- For that essential "shatter" crunch.
- Pickled Jalapeños
- For those who want an extra zing.
When serving, I love using wide, shallow bowls rather than deep mugs. It allows more surface area for toppings! If you really want to go all out, serve it alongside some warm bread. The nostalgia of dipping a piece of Buttermilk Biscuit into the thick chili sauce is hard to beat.
There's a common myth that you need to add sugar or cocoa powder to chili to make it "authentic." The truth is, if you brown your meat properly and let it simmer for the full two hours, the natural sweetness of the onions and stewed tomatoes provides all the balance you need.
Searing the meat doesn't "seal in juices," but it does create the Maillard reaction, which is the actual source of that deep, savory flavor we all crave. Trust the process, keep the lid off, and you'll have a pot of chili that everyone will be asking for the recipe for.

Recipe FAQs
How to make 6666 chili?
Brown the beef in a large Dutch oven over medium high heat for 3 4 minutes without moving it to create a savory crust, then crumble. Sauté diced onions in the beef fat, add minced garlic, stir in the beans, tomatoes, sauce, water, and spices, and simmer uncovered on low for 2 hours.
What's the difference between cowboy chili and regular chili?
Cowboy style chili relies on simple, hearty ingredients and a long, slow simmer. Unlike many modern recipes, this version uses the starch rich liquid from canned beans to naturally thicken the sauce into a velvety texture without adding flour or cornstarch.
Is it true that I should drain the beans before adding them to the pot?
No, this is a common misconception. You must use the beans undrained because that liquid contains the essential starches required to thicken the chili into a proper, velvety consistency during the two-hour simmer.
What are common chili mistakes to avoid?
Avoid using lean beef, rushing the cooking process, or using a thin bottomed pot. Always choose an 80/20 ground beef ratio for moisture, simmer for the full two hours to allow flavors to meld, and use a heavy duty Dutch oven to prevent scorching the bottom.
How to ensure my chili doesn't turn out dry?
Start with 80/20 ground beef to ensure there is enough rendered fat to keep the meat tender throughout the long cooking time. If you enjoy building flavor through browning, you can see how we apply that same principle to create a base for our silky tomato soup.
Can I speed up the two-hour simmer time?
No, the two-hour simmer is critical for texture and flavor. This time allows the liquid from the beans to fully reduce and the stewed tomatoes to break down, ensuring the final dish isn't watery or thin.
How to fix chili that tastes bland?
Check the freshness of your chili powder before starting, as spices lose potency over time. If your spices are fresh, ensure you are sautéing the onions in the beef fat correctly, as this step is vital for building the base flavor profile.
Joanna Gaines Chili Recipe
Ingredients:
Instructions:
Nutrition Facts:
| Calories | 293 kcal |
|---|---|
| Protein | 17.4 g |
| Fat | 14.3 g |
| Carbs | 22.6 g |
| Fiber | 6.2 g |
| Sugar | 6.8 g |
| Sodium | 790 mg |
