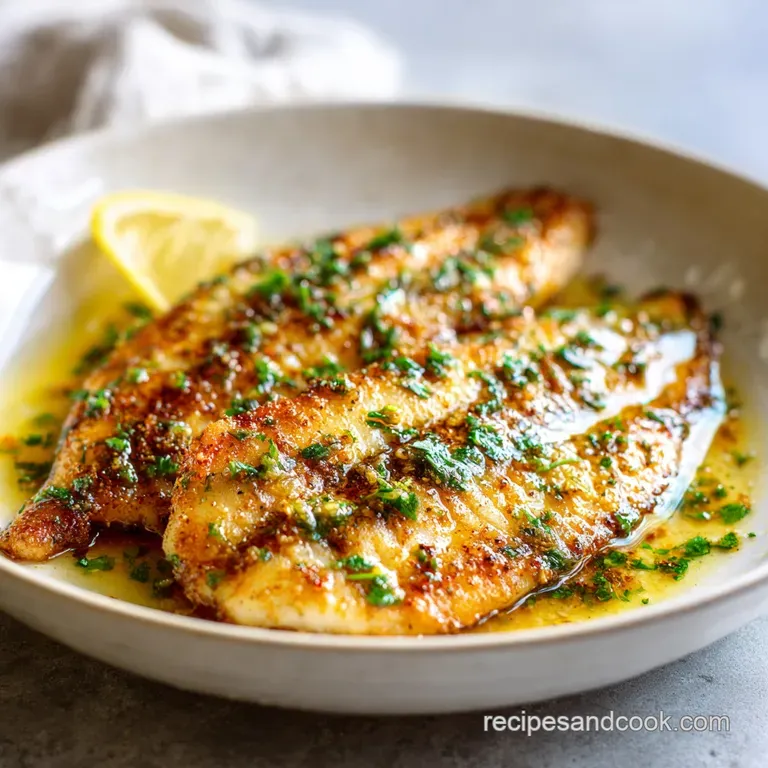
Garlic Butter Tilapia: Restaurant Quality Finish
- Time: Active 5 minutes, Passive 10 minutes, Total 15 minutes
- Flavor/Texture Hook: Flaky, buttery, and zesty
- Perfect for: Busy weeknights or a budget-friendly date night
- Make the Best Garlic Butter Tilapia
- The Physics of the Crust
- Essential Components for Best Flavor
- Necessary Kitchen Gear for Success
- Ingredient Swaps and Adaptations
- Step-by-Step Guide to Success
- Troubleshooting Your Tilapia Texture
- Adjusting for More or Less
- Busting Common Fish Cooking Myths
- Storage and Leftover Life
- Perfect Sides and Pairings
- Recipe FAQs
- 📝 Recipe Card
Make the Best Garlic Butter Tilapia
The sound of a cold fillet hitting a hot pan is one of my favorite kitchen songs. I remember the first time I tried making this for a friend who swore they hated fish. They walked into my apartment, smelled the garlic and lemon hits the butter, and asked if I was making shrimp scampi.
When I told them it was just a simple tilapia recipe, they didn't believe me until they took that first bite of the flaky, pan seared crust.
We've all been there with tilapia sometimes it turns out bland, watery, or just plain boring. But once you master the trick of using cold butter at the very end, you get this velvety sauce that clings to the fish instead of just sliding off.
It’s a timeless comfort dish that uses modern shortcuts, like using a single pan to build both the sear and the sauce, making cleanup a breeze. Right then, let’s get into how to make this work every single time without breaking the bank.
Trust me, you don't need expensive sea bass to have a fancy feeling dinner. This method relies on pantry staples and a few smart techniques I've picked up over years of "oops" moments in my own kitchen. We are going to focus on achieving that golden brown exterior while keeping the inside moist and tender.
It’s all about heat management and timing.
The Physics of the Crust
Surface Dehydration: Patting the fish dry removes surface moisture that would otherwise turn into steam, preventing a golden sear. This ensures the Maillard reaction occurs immediately upon contact with the hot oil.
Fat Emulsification: Adding cold, cubed butter to a hot pan creates a thick, creamy emulsion because the milk solids and fats don't separate as quickly as melted butter. This results in a sauce with a velvety body that coats the fish perfectly.
Quick Decision Cook Method
| Method | Time | Texture | Best For |
|---|---|---|---|
| Stovetop | 8 minutes | Crispy, golden crust | Maximum flavor and speed |
| Oven Baked | 12 minutes | Tender, poached feel | Hands off meal prep |
| Air Fryer | 10 minutes | Firm and very dry | A mess free, quick meal |
Adding the lemon zest at the very end preserves the volatile oils that give the dish its bright, aromatic punch. If you love a garlic heavy meal, these fillets go great with my Garlic Potatoes and recipe for a full comfort experience.
Essential Components for Best Flavor
| Ingredient | Science Role | Pro Secret |
|---|---|---|
| Tilapia Fillets | Lean Protein | Buy them frozen and thaw in the fridge for a firmer texture. |
| Cold Butter | Emulsifier | Keeps the sauce from "breaking" into a greasy mess. |
| Smoked Paprika | Color/Flavor | Provides a deep red hue that looks better than plain searing. |
| Lemon Juice | Acid | Breaks down the fish proteins slightly for a tender mouthfeel. |
Choosing the right fat for the initial sear is vital. Avocado oil has a high smoke point, which means it won't burn while we are trying to get that beautiful color on the tilapia. If you used butter from the start, those milk solids would turn black before the fish was even halfway cooked.
Necessary Kitchen Gear for Success
You don't need a high end kitchen, but a heavy bottomed skillet is your best friend here. A cast iron pan (like a Lodge) or a heavy stainless steel skillet holds heat better than thin aluminum. This prevents the pan temperature from dropping the second you add the cold fish.
- Large Skillet: 12 inch size ensures the fish isn't crowded.
- Fish Spatula: Its thin, flexible edge slides under the delicate fillets without breaking them.
- Paper Towels: Non negotiable for drying the fish.
- Microplane: For that fresh lemon zest that makes the dish pop.
Chef Tip: If your pan isn't non stick, wait for the fish to "release" naturally. If it’s sticking, it’s not ready to flip yet!
Ingredient Swaps and Adaptations
- 4 large tilapia fillets: (approx. 170g each) Why this? Lean, mild, and absorbs the garlic butter flavor beautifully.
- Substitute: Cod or Flounder. These are also mild white fish but may require 1-2 minutes more cooking time.
- 1 tsp smoked paprika: Why this? Adds a subtle earthiness and a gorgeous golden red color.
- Substitute: Sweet paprika or a pinch of chipotle powder for extra heat.
- 0.5 tsp sea salt: Why this? Enhances the natural sweetness of the white fish.
- Substitute: Kosher salt (use slightly more) or celery salt.
- 0.25 tsp cracked black pepper: Why this? Provides a sharp, floral bite to balance the fat.
- Substitute: White pepper for a more subtle, earthy heat.
- 1 tbsp avocado oil: Why this? High smoke point prevents the pan from smoking at high heat.
- Substitute: Grapeseed oil or any neutral over high heat oil.
- 3 tbsp unsalted grass fed butter: (cold and cubed) Why this? Grass fed butter has more beta carotene and a richer flavor.
- Substitute: Ghee (though you’ll lose the creamy emulsion) or vegan butter sticks.
- 4 cloves garlic, minced: Why this? The backbone of the flavor profile.
- Substitute: 1 tsp garlic powder mixed into the dry rub if you're out of fresh.
- 1 large lemon: (juiced and zested) Why this? The acid cuts through the butter's richness.
- Substitute: Lime juice for a more tropical, sharp citrus note.
- 1 tbsp fresh Italian parsley: Why this? Adds a fresh, peppery finish and bright color.
- Substitute: Fresh chives or cilantro.
step-by-step Guide to Success

- Dry the fish. Use paper towels to pat both sides of the 4 tilapia fillets until bone dry. Note: This is the most important step for a good sear.
- Season the fillets. Mix the 1 tsp smoked paprika, 0.5 tsp sea salt, and 0.25 tsp pepper, then sprinkle evenly over both sides of the fish.
- Heat the skillet. Add 1 tbsp avocado oil to a large skillet over medium high heat until the oil shimmers and barely wisps of smoke appear.
- Sear the first side. Place fillets in the pan (don't crowd!). Cook for 3 minutes until the edges look opaque and the bottom is golden.
- Flip carefully. Use a fish spatula to turn the fillets over. Cook for another 2 minutes.
- Lower the heat. Reduce the flame to medium low to prevent the garlic from scorching in the next step.
- Add the aromatics. Push the fish to one side and drop in the 4 minced garlic cloves. Sauté for 30 seconds until fragrant but not browned.
- Mount the butter. Add the 3 tbsp cold, cubed butter and the lemon juice. Whisk the melting butter into the juice until a velvety, thick sauce forms.
- Baste the fish. Spoon the bubbling garlic butter over the fillets repeatedly for 1 minute.
- Finish and serve. Turn off the heat. Top with lemon zest and 1 tbsp chopped parsley. Rest for 2 minutes before serving.
Troubleshooting Your Tilapia Texture
Why Your Fish Falls Apart
Tilapia is delicate. If you flip it too early or too many times, the muscle fibers will separate and the fillet will shatter. The key is patience. Let the heat build a crust that acts as a structural "shell" for the tender meat inside.
| Problem | Root Cause | Solution |
|---|---|---|
| Rubbery Texture | Overcooking | Pull the fish at 63°C; carryover heat finishes it. |
| Soggy/Grey Exterior | Wet Fish | Pat dryer and ensure the oil is shimmering hot. |
| Bitter Aftertaste | Burnt Garlic | Add garlic only after lowering the heat at the end. |
Common Mistakes Checklist
- ✓ Forgetting to thaw the fish completely (frozen centers stay raw).
- ✓ Using a pan that is too small (crowding causes steaming).
- ✓ Moving the fish around too much before the sear sets.
- ✓ Adding the lemon juice too early, which can make the crust mushy.
- ✓ Using pre minced garlic from a jar, which lacks the pungent oils of fresh.
Adjusting for More or Less
When you need to feed a crowd, don't try to cram 8 fillets into one pan. Work in batches. Keep the first batch warm in a 90°C oven on a wire rack while you finish the rest.
For the garlic butter sauce, wait until all the fish is cooked, then make one big batch of sauce in the pan to pour over everything at once.
If you are cooking for just one, use a small 8 inch skillet and half the ingredients. However, I usually make the full amount of garlic butter anyway because it’s fantastic over steamed veggies the next day. For those days when you want something crunchier and are already in a "garlic mood," check out this Garlic Parmesan Wings recipe for your next gathering.
Busting Common Fish Cooking Myths
Myth: You must wash fish before cooking. Truth: Rinsing fish actually spreads bacteria around your sink and makes it impossible to get a crispy sear because of the added moisture. Just pat it dry with paper towels.
Myth: Tilapia is a "dirty" fish. Truth: Most tilapia sold in major grocery stores is responsibly farmed. It’s a sustainable, low mercury protein that is incredibly budget smart for families.
Myth: White fish needs to be cooked until it’s "stiff." Truth: If it’s stiff, it’s overcooked. It should be just opaque and flake easily with a fork while still looking moist in the center.
Storage and Leftover Life
Storage: Store any leftover garlic butter tilapia in an airtight container in the fridge for up to 2 days. I don't recommend freezing the cooked fish, as the texture becomes quite spongy upon thawing.
Reheating: Avoid the microwave! It will turn the fish into rubber. Instead, place the fillets in a cold skillet with a splash of water or a tiny knob of butter. Cover with a lid and heat over medium low for 3-4 minutes.
This creates a gentle steam that warms the fish without drying it out.
Zero Waste Tip: If you have leftover fillets that look a bit sad, flake them into a bowl. Mix with a little mayo, lime, and cilantro to make a killer "fish salad" for sandwiches, or toss them into a corn tortilla with some shredded cabbage for quick fish tacos.
Even the leftover garlic butter in the pan shouldn't go to waste toss it with some pasta or use it to sauté some spinach.
Perfect Sides and Pairings
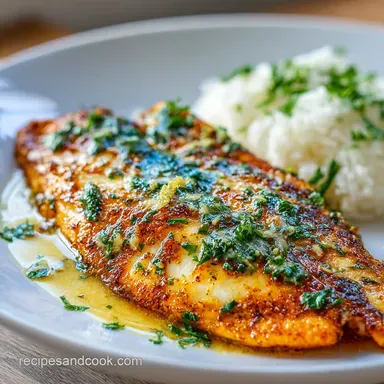
Because this dish is rich and buttery, you want sides that provide a bit of contrast. A crisp green salad with a sharp vinaigrette works wonders. If you want to keep it in the "comfort food" realm, a pile of fluffy rice or quinoa will soak up every drop of that garlic butter sauce.
For a low carb power plate, serve the tilapia over a bed of sautéed zucchini noodles or roasted cauliflower. The lemon in the sauce acts like a built in dressing for the vegetables.
If you’re feeling fancy, a chilled glass of Sauvignon Blanc or a light Pinot Grigio complements the citrus and garlic notes perfectly. This is the kind of meal that brings people together because it’s simple, honest, and consistently good.

Recipe FAQs
Is garlic butter good on tilapia?
Yes, it is excellent on tilapia. The richness of the cold butter creates an emulsion that coats the mild white fish, preventing it from tasting bland. The fresh garlic adds the necessary pungent depth to elevate the flavor profile significantly.
What seasonings go well with tilapia?
Smoked paprika, salt, pepper, and fresh herbs are ideal companions. The paprika gives excellent color while the salt enhances the fish's natural sweetness. For a similar flavor profile focusing on searing technique, check out our guide on the Rockfish recipe.
What makes tilapia taste better?
Proper drying, high heat searing, and finishing with acid/fat are key. Patting the fillets completely dry is crucial to achieving a golden crust instead of steaming them. The final addition of cold butter and fresh lemon juice cuts through the richness for brightness.
What does tilapia pair well with as a side dish?
Crisp, acidic sides or plain starches balance the richness of the butter. Consider a simple green salad with vinaigrette or fluffy white rice to soak up the extra sauce. If you are looking for a heartier baked side, review the technique in our Oven Baked Grilled recipe for timing consistency.
How to avoid overcooking delicate tilapia fillets?
Remove the fish from the heat around 63°C internal temperature. Watch the edges closely; when they turn opaque and the bottom has a good sear, it is time to flip and quickly finish with the butter sauce. This fast cooking method relies on sensory cues rather than long cooking times.
Can I use frozen tilapia fillets for this recipe?
Yes, but you must thaw them completely first in the refrigerator. Cooking from frozen results in uneven heating, where the outside burns before the center warms through, leading to a rubbery texture. If you master temperature control here, you will find that same precision useful when learning How to Cook recipe.
Is it true you must use butter at the very end for the sauce?
No, this is a common misconception; you should use oil first for searing. Start with a high smoke point oil like avocado oil to sear the fish without burning the milk solids in butter. Add the cold butter off the heat at the end to emulsify into a thick, creamy sauce that coats the fish beautifully.
Garlic Butter Tilapia Recipe
Ingredients:
Instructions:
Nutrition Facts:
| Calories | 276 kcal |
|---|---|
| Protein | 34.2 g |
| Fat | 14.9 g |
| Carbs | 2.1 g |
| Fiber | 0.4 g |
| Sugar | 0.3 g |
| Sodium | 345 mg |
