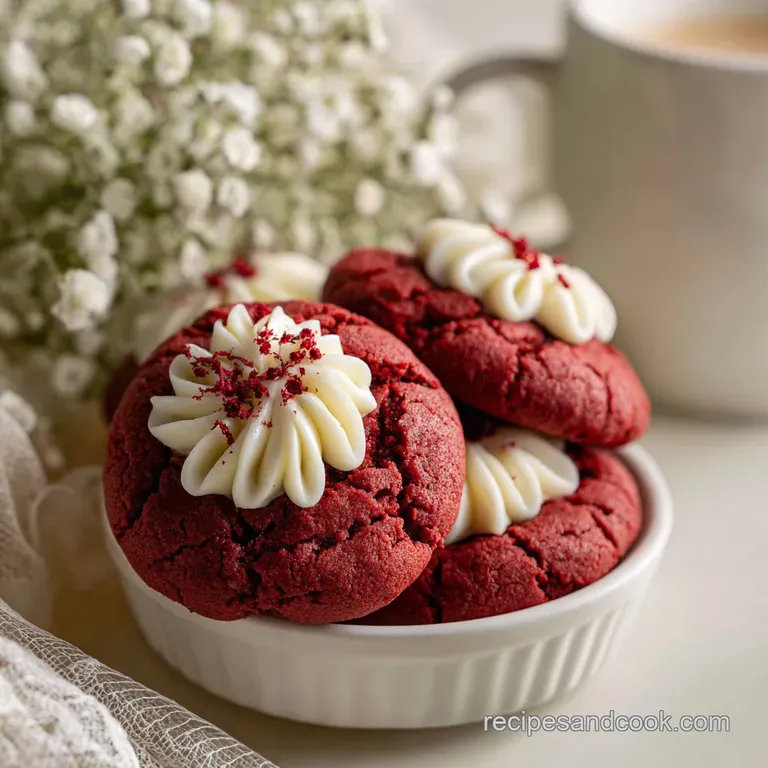
Easy Hershey's Red Velvet Blossoms Cookie with Chocolate Kisses

- Time: Active 15 mins, Passive 40 mins, Total 55 mins
- Flavor/Texture Hook: Fudgy cocoa center with a crackling sugar shell
- Perfect for: Holiday gift boxes or high impact party platters
- Making Easy Hershey's Red Velvet Blossoms Cookie with Chocolate Kisses
- Why This Recipe Always Wins
- The Science of the Crinkle
- Essentials for Red Velvet
- Necessary Tools for Results
- Step By Step Success
- Fixing Common Baking Hurdles
- Adjusting Your Batch Size
- Creative Flavor Twists
- Storage and Waste Prevention
- Perfect Pairings for Dessert
- Debunking Red Velvet Myths
- Recipe FAQs
- 📝 Recipe Card
Making Easy Hershey's Red Velvet Blossoms Cookie with Chocolate Kisses
Ever walked into a room and been immediately hit by the scent of warm cocoa and melting chocolate? That was my kitchen last Tuesday. I remember the first time I pulled these out of the oven, the vibrant crimson dough had just started to shatter into those iconic white dusted cracks.
It looked like something straight out of a high end boutique, but the secret was sitting right in my pantry.
This article shares a simple recipe for Easy Hershey's Red Velvet Blossoms Cookies with Chocolate Kisses. You don't need to be a pastry chef to nail the balance between the supple cookie base and the iconic chocolate crown.
We've all been there, staring at a tray of flat, sad cookies, but this method ensures a thick, chewy bite every single time.
The real magic happens in the contrast of colors. That deep, velvety red against the snowy sugar coating is a showstopper. Whether you're making these for a cookie swap or just a Tuesday treat, they carry an air of sophistication that belies how easy they are to assemble.
Right then, let's look at why this specific approach works so well.
Why This Recipe Always Wins
The Fat Ratio: Using melted butter instead of softened butter creates a denser, more fudge like interior that mimics a brownie's texture.
Acidic Balance: The buttermilk solids in the cake mix react with the eggs to provide a soft, tender crumb that stays moist for days.
Thermal Shock Control: Chilling the dough ensures the fats don't liquify too fast, preventing the cookies from spreading into thin pancakes.
| Cook Method | Prep Time | Resulting Texture | Best Use Case |
|---|---|---|---|
| Standard Oven | 10 mins | Soft and Chewy | Traditional Blossoms |
| Air Fryer | 7 mins | Crispy Outer Shell | Small Quick Batches |
| Toaster Oven | 12 mins | Extra Toasted Edge | Individual Cravings |
Choosing the right method depends on your desired texture. While the air fryer gives a unique snap to the edges, the standard oven method is the gold standard for that uniform, bakery worthy look.
It allows the heat to circulate evenly, ensuring the "crinkle" develops across the entire surface of the red velvet Hershey Kisses cookies.
The Science of the Crinkle
Sugar Dehydration: Rolling the dough in granulated sugar draws moisture from the surface, causing it to dry out and "shatter" as the cookie expands in the heat. This creates the distinct visual valleys and peaks that define a classic blossom.
| Component | Science Role | Pro Secret |
|---|---|---|
| Cake Mix | Structural Base | Provides consistent pH for bright red color |
| Egg Protein | Binding Agent | Use room temperature eggs for faster emulsification |
| Granulated Sugar | Moisture Draw | Coarse crystals produce larger, more dramatic cracks |
The sugar isn't just for sweetness; it’s a functional ingredient that dictates the final aesthetic. When the dough hits the 175°C environment, the exterior sets quickly while the interior is still rising.
This internal pressure forces the set exterior to pull apart, revealing the deep red center underneath.
Essentials for Red Velvet
To get started with this Red velvet Kiss cookies with cake mix project, you'll need a few pantry staples and the star of the show. Using a mix saves you from measuring out cocoa powder and red dye, which can be messy and unpredictable.
- 1 box (432g) Red Velvet Cake Mix Why this? Provides the perfect cocoa to flour ratio and vibrant color.
- 2 large Eggs Why this? Acts as the primary binder for the dense dough.
- 115g Unsalted Butter, melted Why this? Melted butter ensures a chewy, fudgy bite rather than cakey.
- 5ml Pure Vanilla Extract Why this? Rounds out the cocoa notes with a warm aroma.
- 50g Granulated Sugar Why this? Essential for creating the crinkle effect during baking.
- 24 pieces Hershey’s Milk Chocolate Kisses Why this? The iconic center that defines this blossom style.
| Original Ingredient | Substitute | Why It Works |
|---|---|---|
| Unsalted Butter | Coconut Oil (Solid) | High fat content. Note: Adds a subtle tropical scent |
| Granulated Sugar | Sanding Sugar | Larger crystals. Note: Provides a crunchier exterior texture |
| Milk Chocolate Kisses | Dark Chocolate Kisses | Higher cocoa. Note: Less sweet, balances the rich cake mix |
Necessary Tools for Results
You don't need a high tech kitchen to master this Hershey Kiss cookies recipe easy, but a few specific tools make the process much smoother. I personally swear by using a silicone baking mat because it prevents the bottoms from browning too quickly, which can ruin the bright red look.
A spring loaded cookie scoop is also a non negotiable for me. It ensures every single ball of dough is exactly the same size, which means they all finish baking at the exact same second. If you don't have one, use a digital scale to measure out 20g portions.
Trust me, the uniformity is what makes people ask which bakery you bought them from.
Chef Tip: Freeze your chocolate kisses for at least 20 minutes before you start baking. When you press a cold kiss into a hot cookie, it holds its shape perfectly instead of slumping into a puddle of goo.
step-by-step Success
- Melt the butter. Heat 115g of unsalted butter until just liquid, then let it sit for 5 minutes to cool slightly.
- Mix the base. Combine the red velvet cake mix, 2 eggs, cooled butter, and 5ml vanilla in a large bowl.
- Hydrate the dough. Stir until a thick, supple dough forms with no dry streaks of flour remaining.
- Chill the mixture. Cover the bowl and refrigerate for at least 30 mins to make the dough easier to handle.
- Preheat and prep. Set your oven to 175°C and line a heavy baking sheet with parchment paper.
- Form the balls. Scoop about 20g of dough and roll it between your palms into a smooth sphere.
- Apply the coat. Roll each ball in the 50g of granulated sugar until completely and heavily encrusted.
- Bake the cookies. Space them 5cm apart and bake for 10 mins until the surface is matte and cracked.
- Press the kiss. Immediately after removing from the oven, press one Hershey’s Kiss into the center of each cookie.
- Set the chocolate. Let the cookies rest on the pan for 5 minutes before moving them to a wire rack.
For another variation on this technique, you might enjoy my Snickerdoodle Cookies recipe, which also uses the sugar rolling method for a perfect crinkle.
| Feature | From Scratch | Cake Mix Shortcut |
|---|---|---|
| Prep Time | 25 minutes | 5 minutes |
| Color Consistency | Variable | Consistent Vivid Red |
| Texture | Denser | Lighter/Velvety |
Fixing Common Baking Hurdles
Sticky Dough Fixes
If your dough is clinging to your hands like glue, it simply hasn't chilled long enough. The melted butter needs time to firm back up. If you're in a rush, pop the bowl in the freezer for 10 minutes.
Also, try lightly dampening your hands with water before rolling the balls; it prevents the dough from sticking without adding extra flour.
Melting Kiss Problems
It’s heartbreaking when those beautiful chocolate peaks turn into flat disks. This usually happens if the cookies are too hot or if the Kisses were stored in a warm pantry. Always use the freezer trick mentioned earlier.
If they still seem to be melting, move the entire tray to a cool area or even the fridge for 5 minutes immediately after pressing the chocolate in.
No Crinkle Issues
If your cookies come out smooth instead of cracked, the dough was likely too warm when it hit the oven. The "shatter" effect depends on the temperature differential between the cold dough and the hot air. Also, ensure you are using enough sugar.
If the coating is too thin, it won't provide the tension needed to crack the surface.
| Problem | Root Cause | Solution |
|---|---|---|
| Flat Cookies | Butter too hot | Chill dough for a full 30 mins |
| Tough Texture | Overmixing | Stir until ingredients just combine |
| Grainy Bottoms | Too much sugar | Shake off excess sugar after rolling |
Common Mistakes Checklist:
- ✓ Never use "light" or "low-fat" spreads; the high water content will make the cookies spread too much.
- ✓ Ensure your eggs are at room temperature to avoid seizing the melted butter.
- ✓ Don't skip the cooling time for the butter; hot butter can cook the eggs prematurely.
- ✓ Avoid over baking; the cookies should still look slightly soft in the center when you pull them out.
- ✓ Work in batches if your kitchen is hot to keep the remaining dough cold.
Adjusting Your Batch Size
Scaling this recipe is fairly straightforward because the cake mix acts as a pre measured anchor. If you want to cut the recipe in half, beat one egg in a small bowl and use exactly half of it (roughly 25g). Use a small 200g portion of the cake mix and reduce the butter to 57g.
Keep the baking time the same, as the individual cookie size remains constant.
When doubling the recipe for a big event, I recommend making two separate batches rather than mixing one giant bowl. This prevents the dough at the bottom from getting too warm while you roll the first 24. If you must mix a double batch, keep half the dough in the fridge while you work. You can also look at my Peanut Butter Blossom Cookies recipe if you need to provide a variety of flavors for a large crowd.
Creative Flavor Twists
If you want to move beyond the traditional Hershey Kiss Thumbprint Cookies Red Velvet Blossoms, try a garnish strategy with color accents. You can add a tiny pinch of sea salt on top of the chocolate for a savory edge.
Alternatively, drizzle a small amount of white chocolate over the cooled cookies to add a "lace" effect that pops against the red.
- White Chocolate Contrast: Swap the milk chocolate for a white chocolate Kiss for a "Red Velvet and Cream" flavor profile.
- Peppermint Edge: Use Candy Cane Kisses during the holidays for a refreshing minty twist.
- Dark Decadence: Use a dark chocolate kiss and add a half teaspoon of espresso powder to the dough.
The "Hugs" and "Kisses" Twist
Using Hershey's Hugs (the striped ones) adds a beautiful visual swirl. Just be careful, as Hugs have a lower melting point than the solid chocolate Kisses. You may need to chill the cookies for 2 minutes before pressing the Hugs in to ensure they don't lose those pretty stripes.
Storage and Waste Prevention
These cookies stay soft for about 4 to 5 days if kept in an airtight container at room temperature. To keep them extra supple, tuck a small piece of white bread into the container; the cookies will absorb the moisture from the bread.
If you're stacking them, place a sheet of parchment paper between the layers so the chocolate tips don't smudge the bottoms of the cookies above them.
For zero waste baking, if you have leftover cake mix that didn't make it into a full cookie, whisk it into a morning pancake batter or use it as a base for a single serve mug cake. If you find yourself with extra melted butter, it makes a fantastic base for a quick honey butter spread for toast.
Perfect Pairings for Dessert
Red velvet has a natural affinity for dairy. A tall glass of cold whole milk is the classic choice, but if you're serving these at a party, consider a side of lightly sweetened cream cheese dip. It mimics the flavor of a traditional red velvet cake with cream cheese frosting.
If you’re building a holiday dessert board, pair these Hershey Kiss cookies without peanut butter alongside some tart green apple slices or fresh raspberries. The acidity of the fruit cuts through the richness of the chocolate and the buttery dough, making each bite feel fresh.
Debunking Red Velvet Myths
A common misconception is that red velvet is just chocolate cake with red food coloring. In reality, traditional red velvet relies on the chemical reaction between acidic buttermilk and raw cocoa powder to create a mahogany hue.
While we use a mix for convenience, the flavor profile is more about the "tang" than just straight chocolate.
Another myth is that you can't freeze cookies with the chocolate already attached. You actually can! Once the chocolate has fully set and hardened (which takes about 2 hours at room temp), you can freeze them for up to 2 months.
Just let them thaw slowly at room temperature to avoid "blooming" the chocolate, which is when the cocoa butter rises to the surface and creates white streaks.

Recipe FAQs
Can I substitute softened butter for the required melted butter?
No, stick to melted butter for this recipe. Melted butter yields the necessary dense, fudge like interior texture that defines these cookies, while softened butter results in a cakey crumb.
How to prevent the Hershey Kisses from sinking or melting completely?
Press the Kisses immediately after the cookies exit the oven. For best results, chill the Kisses in the freezer for at least 20 minutes beforehand to maximize thermal shock resistance.
Must the cookie dough be chilled before rolling and baking?
Yes, chilling is crucial for texture control. Chilling firms up the melted butter content, preventing the cookies from spreading too thin during baking and ensuring a thick center.
Is it necessary to roll the dough balls heavily in granulated sugar?
Yes, this step creates the signature cracked look. The exterior sugar draws moisture, setting the surface quickly so that when the interior rises, the surface shatters into those distinctive cracks.
What happens if I skip the cake mix and use standard flour and cocoa powder?
No, you will significantly alter the texture and color. Cake mix provides precise leavening agents and dye needed for the velvet crumb; substituting requires carefully balancing fat, acid, and rising agents, similar to balancing our KitchenAid Ice Cream recipe base.
How long can these red velvet cookies be stored while retaining their chewiness?
They maintain peak softness for 4 to 5 days at room temperature. Store them in an airtight container with a slice of plain white bread to absorb any evaporating moisture and keep them supple.
How do I ensure all the cookies bake evenly at the same time?
Use a calibrated cookie scoop for consistent mass. Ensure all dough balls are uniform in size, around 20 grams, so they reach doneness simultaneously without some edges burning while others remain raw.
Easy Red Velvet Blossom Cookies

Ingredients:
Instructions:
Nutrition Facts:
| Calories | 137 calories |
|---|---|
| Protein | 1.4 g |
| Fat | 6.2 g |
| Carbs | 19.3 g |
| Fiber | 0.3 g |
| Sugar | 12.6 g |
| Sodium | 72 mg |
