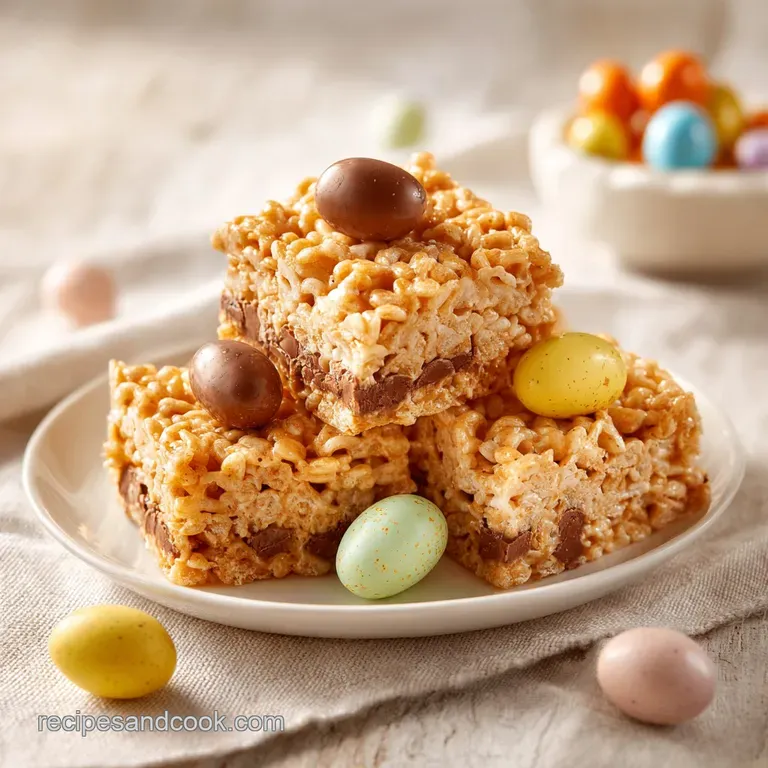
Easter Rice Krispie Treats with Chocolate Eggs
- Time: Active 10 minutes, Passive 10 minutes, Total 20 minutes
- Flavor/Texture Hook: Velvety marshmallow clouds with a satisfying chocolate egg shatter
- Perfect for: Easter brunch grazing or a fast, foolproof holiday dessert
- Easy Easter Rice Krispie Treat Recipe with Chocolate Eggs
- Why These Treats Stay Soft
- Essential Ingredients and Smart Swaps
- Tools for Bakery Worthy Results
- Step By Step Success Guide
- Solving Common Marshmallow Messes
- Creative Flavor and Texture Twists
- Keeping Your Squares Fresh Longer
- Best Pairings for Easter Brunch
- Recipe FAQs
- 📝 Recipe Card
Easy Easter Rice Krispie Treat Recipe with Chocolate Eggs
Listen, we’ve all been there. You grab a box of cereal and a bag of marshmallows, thinking it’s a five minute job, only to end up with a pan of bricks that could break a tooth. The biggest myth in the dessert world is that you need high heat to melt things fast.
Forget everything you know about blasting that burner to get the job done quickly. Discover the ultimate, simple way to craft delicious Easter Rice Krispie treats adorned with chocolate eggs by embracing the "low and slow" philosophy.
When you walk into a high end bakery, their cereal treats aren't just sugary; they have a certain loft and a pull that seems to last for days. That isn't magic; it’s moisture management. Most people overcook the marshmallow sugar, turning it into a hard caramel. We aren't doing that today.
We’re going for a texture that feels like a cloud but has the festive crunch of those iconic candy coated eggs.
I remember my first attempt at an Easy Easter Rice Krispie Treat Recipe with Chocolate Eggs where I pressed the mixture into the pan like I was trying to seal a leak in a boat. They were so dense we had to use a steak knife to cut them. Since then, I’ve learned that the secret is in the air you leave behind.
This version is light, vibrant, and exactly what your holiday table needs.
Why These Treats Stay Soft
The magic of this recipe isn't just in the ingredients, but in how we handle the proteins and sugars. By keeping the temperature down, we prevent the marshmallow from dehydrating, which is what usually leads to that "rock hard" result after an hour of sitting on the counter.
- Delayed Melting: Leaving 10% of the marshmallows whole before removing from heat ensures they continue to melt into the cereal, creating "gooey pockets."
- Fat Emulsification: high-quality butter acts as a barrier, coating the rice grains so they don't get soggy from the sugar moisture.
- Starch Protection: The rice cereal stays crispy because the fat to sugar ratio is balanced to prevent immediate hydration of the toasted grain.
- Aroma Depth: Using both vanilla and almond extracts creates a complex "birthday cake" flavor profile that cuts through the simple sweetness.
| Method | Cook Time | Final Texture | Shelf Life |
|---|---|---|---|
| High Heat Melt | 4 minutes | Hard/Brittle | 12 hours |
| Low Heat (Pro) | 10 minutes | Soft/Stretchy | 3 days |
| Microwave | 2 minutes | Sticky/Dense | 6 hours |
It’s about as satisfying as watching creamy homemade yogurt set the patience pays off in the texture. When you take that first bite, the marshmallow should stretch, not snap.
Essential Ingredients and Smart Swaps
To get that bakery worthy result, every component serves a purpose. We aren't just throwing things in a bowl; we’re building a flavor bridge between the salty butter and the sweet chocolate.
| Component | Science Role | Pro Secret |
|---|---|---|
| Unsalted Butter | Moisture Barrier | Use European style for higher fat content |
| Mini Marshmallows | Structural Binder | Use fresh bags only; old ones don't melt smoothly |
| Rice Cereal | Texture Base | Toast it for 5 mins in the oven for extra snap |
| Almond Extract | Flavor Multiplier | This makes them taste like a professional bakery |
Ingredients & Substitutes
- 6 cups Crispy Toasted Rice Cereal: The backbone. Why this? Provides the essential light as-air crunch. (Sub: Cocoa rice cereal for a double chocolate version)
- 10 oz Fresh Mini Marshmallows: The main binder. Why this? Melts faster and more evenly than large puffs. (Sub: Vegan marshmallows, but watch the melt point)
- 2 cups Fresh Mini Marshmallows: For folding. Why this? Creates the iconic "gooey spots" in the square. (Sub: Dehydrated marshmallows for a different crunch)
- 6 tbsp Unsalted Butter: The fat source. Why this? Allows you to control the salt levels perfectly. (Sub: Salted butter, but omit the extra sea salt)
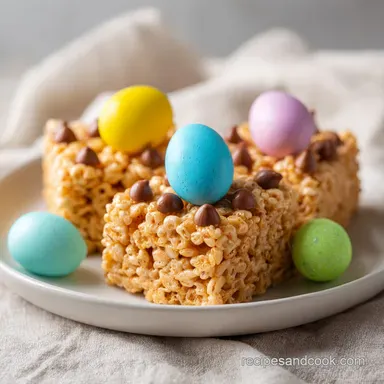
- 1.5 cups Crushed Mini Chocolate Eggs: The Easter flair. Why this? Adds a milk chocolate richness and festive color. (Sub: M&Ms or chopped malted milk balls)
- 0.5 cup Whole Mini Chocolate Eggs: For the top. Why this? Ensures everyone knows exactly what flavor to expect. (Sub: Jelly beans for a fruitier twist)
- 1 tsp Pure Vanilla Extract: Foundation flavor. Why this? Rounds out the sweetness of the corn syrup. (Sub: Vanilla bean paste for aesthetic flecks)
- 0.25 tsp Almond Extract: The "secret" ingredient. Why this? Adds a professional, complex floral note. (Sub: Double the vanilla if you have a nut allergy)
- 0.5 tsp Fine Sea Salt: The balancer. Why this? Cuts the sugar and makes the chocolate pop. (Sub: Kosher salt, but use a bit more)
Tools for Bakery Worthy Results
Having the right gear makes the difference between a sticky disaster and a smooth process. You don't need a professional kitchen, but a few specific items will save your sanity.
- Large Non Stick Pot: A heavy bottomed Dutch oven is my go to. It distributes heat evenly, preventing the butter from browning too fast.
- 9x9 Inch Square Pan: This size gives you the perfect thickness not too thin, not too chunky.
- Silicone Spatula: This is non negotiable. Marshmallows stick to wood and metal like glue, but they slide right off silicone.
- Parchment Paper: Forget just greasing the pan. You want a "sling" so you can lift the entire block out for clean slicing.
- Sharp Chef's Knife: A dull knife will squish the treats. A sharp blade, lightly greased with butter, will glide through the chocolate eggs.
step-by-step Success Guide

- Line your 9x9 inch square baking pan with parchment paper. Make sure there is an overhang on at least two sides so you can lift it out later. Lightly grease the parchment with a tiny bit of butter to be safe.
- In your large non stick pot, melt the 6 tablespoons of butter over the lowest possible heat setting. We are looking for a slow melt, not a sizzle.
- Dump the 10oz bag of marshmallows into the melted butter. Stir constantly. Remove the pot from the heat when they are about 90% melted. You want to see a few small lumps; they will finish melting off the heat, which keeps the sugar from getting too hot.
- Whisk in the vanilla extract, almond extract, and fine sea salt. The mixture should look glossy and velvety.
- Pour in the 6 cups of rice cereal. Use your silicone spatula to gently fold the mixture until every single grain of cereal is coated in that marshmallow gold.
- Now, the "gooey" secret: fold in the reserved 2 cups of whole mini marshmallows and the 1.5 cups of crushed chocolate eggs. The residual heat will soften them without making them disappear.
- Transfer the sticky mixture into your prepared 9x9 pan.
- This is the most important part: use a buttered spatula to press the mixture down very lightly. Do not pack it. You want to just level the surface. If you press too hard, you lose the air and end up with a hard bar.
- Press the remaining 0.5 cup of whole mini chocolate eggs into the top for that showstopping garnish.
- Let the treats sit at room temperature for at least 30 minutes. Resist the urge to refrigerate them, as this can make the cereal lose its snap. Lift the sling, slice into 12 squares, and serve.
Solving Common Marshmallow Messes
If your treats didn't turn out quite right, don't panic. Most issues come down to temperature or pressure. Even the best of us have ended up with a sticky mess on the ceiling at some point.
Why Your Squares Are Brittle
If your squares feel like crackers rather than soft treats, you likely overheated the marshmallow binder. When sugar gets too hot, it moves into the "hard ball" stage. Once it cools, it sets firmly. Always pull the pot off the stove while you still see some white marshmallow shapes.
Why The Chocolate Eggs Melted
If you ended up with a brown, muddy mess instead of bright festive colors, the mixture was too hot when you added the crushed eggs. The candy coating on mini eggs is thin; wait about 60 seconds after mixing the cereal before you toss in the chocolate.
| Problem | Root Cause | Solution |
|---|---|---|
| Treats are rock hard | Overcooked marshmallows | Use lowest heat; remove when 90% melted |
| Soggy cereal | High humidity or old cereal | Store in airtight container; use fresh box |
| Chocolate smeared | Added eggs while too hot | Let cereal marshmallow mix cool for 1 min |
Common Mistakes Checklist
- ✓ Freshness Check: Always use a brand new bag of marshmallows. Older ones have a thick "skin" that doesn't melt smoothly.
- ✓ Heat Management: Keep the burner on the lowest setting possible. If you think it’s too low, it’s probably just right.
- ✓ The Gentle Touch: Never pack the mixture into the pan. Think of it as "tucking it into bed" rather than "paving a driveway."
- ✓ Grease Everything: Butter your spatula, your hands, and your knife. Marshmallow is a formidable opponent.
- ✓ Salt is Essential: Without the sea salt, the treats will taste one dimensional. The salt is what makes the chocolate flavor "bloom."
Creative Flavor and Texture Twists
Once you master the base Easy Easter Rice Krispie Treat Recipe with Chocolate Eggs, you can start playing with the ratios. This recipe is surprisingly sturdy if you want to add more "stuff" to it.
For a smaller batch (half size), use an 8x4 inch loaf pan. Reduce the butter to 3 tablespoons and use exactly half of all other ingredients. If you are scaling up for a big party (double batch), use a 9x13 inch pan.
Just remember that when you double the recipe, the marshmallow mixture will hold heat longer, so you might need to wait an extra minute before adding the chocolate eggs to prevent melting.
If you are looking for more festive ideas, this Easter No Bake Cheesecake is another fantastic use for those mini chocolate eggs.
Chef Tip: For an extra layer of flavor, brown the butter first. Let it bubble until it smells nutty and has little brown flecks, then immediately add the marshmallows. This adds a toasted, sophisticated note to the final square.
Keeping Your Squares Fresh Longer
These treats are at their absolute peak within the first 6 hours, but you can keep them fresh for up to 3 days if you follow a few rules.
Storage: Keep them in an airtight container at room temperature. If you have to stack them, put a piece of wax paper between the layers so they don't fuse into one giant block.
Never put them in the fridge; the cold temperature kills the marshmallow’s elasticity and makes the cereal go stale faster.
Freezing: Surprisingly, you can freeze these! Wrap individual squares in plastic wrap, then put them in a freezer bag for up to 2 months. To eat, let them thaw on the counter for 15 minutes. They actually make a great cold snack on a warm spring day.
Zero Waste: If you have leftover cereal crumbs at the bottom of the bag, don't throw them out! You can use them to top yogurt or even as a coating for French toast. If you have extra mini eggs, crush them up and stir them into a batch of this Shredded Apple Bread for a surprising chocolatey crunch.
Best Pairings for Easter Brunch
These squares are the star of the show, but they play well with others. Since they are quite sweet, I love serving them with something tart or caffeinated to balance the palate.
A cold glass of milk is the classic choice, but if you’re hosting brunch, try serving these alongside a strong, bitter espresso or a tart hibiscus iced tea. The floral notes in the tea match perfectly with the almond extract in the treats.
If you’re making a full dessert spread, these squares look beautiful next to pastel colored fruit skewers or a bowl of fresh strawberries. The vibrant colors of the chocolate eggs usually pastel blues, pinks, and yellows provide the perfect color balance against the golden white marshmallow base.
- 1. Crushed Speckles
- Add these in step 6. They provide the "internal" color that shows when you bite into the square.
- 2. Whole Pops
- Press these onto the top in step 9. They provide the "external" visual appeal.
- 3. The Reveal
- Use a sharp, warm knife for the cleanest cuts, showing off the cross section of the chocolate eggs and the stretchy marshmallow.
This Easy Easter Rice Krispie Treat Recipe with Chocolate Eggs is more than just a quick snack; it’s a masterclass in texture and simple holiday joy. Just remember: low heat, gentle hands, and don't skimp on the salt!

Recipe FAQs
How to keep Rice Krispie treats from becoming hard and brick like?
Press the mixture into the pan very lightly. Avoid packing the cereal down, as compressing it removes the air pockets that keep the treats soft and chewy.
Is it true that I should melt the marshmallows completely until smooth?
No, this is a common misconception. You should remove the pot from the heat when the marshmallows are only 90% melted, leaving a few small lumps that will finish melting off-heat to preserve moisture.
How to ensure the chocolate eggs don't melt when added to the mixture?
Wait until the cereal and marshmallow binder have cooled slightly before folding in the crushed eggs. If you enjoyed mastering this specific temperature control technique here, you can apply similar heat sensitivity principles when tempering eggs for a silky custard base.
Why is my marshmallow mixture grainy or separating?
You likely used too much heat. Always melt the butter and marshmallows over the lowest possible heat setting to keep the marshmallow binder glossy and properly emulsified.
Can I use an old, partially used bag of marshmallows for this recipe?
No, always use a fresh bag. Marshmallows that have been sitting open develop a tough exterior skin that prevents them from melting into a smooth, gooey binder.
How to slice the treats without the knife getting stuck in the marshmallow?
Grease your knife with a little bit of butter before each cut. This creates a barrier that prevents the sticky marshmallow from adhering to the blade.
How to get the treats out of the pan easily after they set?
Line the 9x9 inch pan with parchment paper, leaving an overhang on the sides. This creates a "sling" that allows you to lift the entire block of treats out of the pan cleanly after the 30-minute setting time.
Easter Rice Krispie Treats
Ingredients:
Instructions:
Nutrition Facts:
| Calories | 371 calories |
|---|---|
| Protein | 2.7g |
| Fat | 13g |
| Carbs | 62g |
| Fiber | 0.4g |
| Sugar | 45g |
| Sodium | 191mg |
