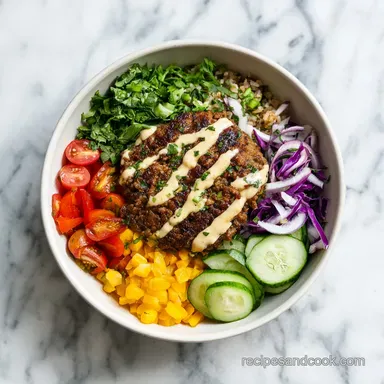
Smash Burger Bowl: Crispy and Caramelized
- Time:10 minutes active + 10 minutes cooking = Total 20 minutes
- Flavor/Texture Hook: Shatteringly crisp beef edges paired with velvety, tangy smash sauce.
- Perfect for: High protein weeknight dinners or low carb meal prep.
- Create a Savory Smash Burger Bowl
- Why This Bowl Actually Works
- Cook Method Comparison Table
- Deep Dive Into Your Ingredients
- Selecting Your Fresh Elements
- Essential Tools for the Sear
- Mastering the Smash Technique
- Fixing Common Searing Mistakes
- Scaling for Any Size Crowd
- Flavorful Ways to Swap Ingredients
- Debunking Traditional Burger Myths
- Smart Storage and Zero Waste
- Best Pairings for This Bowl
- Recipe FAQs
- 📝 Recipe Card
Create a Savory Smash Burger Bowl
Close your eyes and listen for a second. It's the sound of a heavy metal spatula pressing down onto a hot cast iron surface. There’s that immediate, aggressive hiss as the cold beef hits the scorching metal, sending up a plume of savory, mouth watering steam.
That smell the one that reminds you of late night diners and paper wrapped burgers is exactly what we are recreating right here in your own kitchen. Honestly, I used to think you needed a professional flattop grill to get those lacy, crispy edges on a burger, but I was so wrong.
You don't need a professional kitchen, but you do need a little bit of nerve. The first time I tried to make a Smash Burger Bowl, I was too timid with the heat and didn't press down hard enough. I ended up with what I call "sad grey meatballs" instead of the mahogany crusted beauties we’re after.
It was a total letdown, and my kitchen smelled like a wet sock. But after a few trials (and one very smoky apartment), I realized that the secret isn't just the meat; it's the physics of the smash itself. We are going for maximum surface area here, friends.
This isn't just a salad with a burger on top let’s get that straight right now. This is a deconstructed experience where every bite of lettuce is coated in a velvety, tangy sauce and every morsel of beef has been seared to a literal "shatter" point.
It’s the kind of meal that makes you forget you aren't eating a bun. We’re keeping things budget friendly by using pantry staples for the sauce and a standard pound and a half of ground beef, proving you don't need expensive cuts to get premium flavor.
Why This Bowl Actually Works
Pressure Induced Browning: When you press the beef into the hot pan with force, you’re maximizing contact between the meat and the metal. This ensures that the natural sugars and proteins in the beef transform into a deep, mahogany crust across the entire surface rather than just in small spots.
The Acid Balance: The heavy fats in the beef and cheese are quite rich, so the signature sauce uses pickle brine and mustard to cut through that weight. This constant interplay between the salty fat and the sharp acid is what keeps your palate from getting bored after three bites.
Temperature Contrast: Serving sizzling hot, cheese covered beef directly onto ice cold, shredded romaine creates a sensory experience that feels fresh and indulgent at the same time.
The lettuce stays "shatter" crisp if you layer it correctly, preventing the bottom of the bowl from becoming a soggy mess.
Cook Method Comparison Table
| Method | Time | Texture | Best For |
|---|---|---|---|
| Cast Iron Skillet | 10 minutes | Maximum lacy, crispy edges | Recreating the diner experience at home |
| Flat Top Griddle | 10 minutes | Even browning across many patties | Feeding a family of 4-6 at once |
| Stainless Steel Pan | 12 minutes | Good crust, but prone to sticking | If you don't own a heavy cast iron |
Choosing the right vessel is half the battle when you're working toward that specific "smash" texture. While a stainless steel pan can work in a pinch, the heat retention of a heavy Lodge cast iron is really what makes the beef sear instead of just steaming in its own juices.
Trust me, if the pan isn't screaming hot, you won't get those iconic crispy bits that define a Smash Burger Bowl.
If you are looking for other high protein options that don't require standing over a hot stove for an hour, you might want to check out my Sticky Shoyu Chicken recipe for a different take on the protein bowl concept. It uses a similar logic of balancing salt and sweet to keep things interesting.
Deep Dive Into Your Ingredients
| Component | Science Role | Pro Secret |
|---|---|---|
| 80/20 Ground Beef | Fat provides the "sizzle" medium | Keep it cold until the very second it hits the pan |
| Pickle Brine | Acts as a liquid seasoning and tenderizer | Use the "cloudy" brine from the bottom of the jar for more punch |
| Yellow Mustard | Provides emulsification for the sauce | Don't swap for Dijon; the vinegar in yellow mustard is essential |
| Romaine Lettuce | Structural integrity under heat | Shred it into 1/2 inch ribbons to trap more sauce |
Selecting Your Fresh Elements
To make this Smash Burger Bowl truly stand out, we need to talk about the quality of what's going into the pan. This isn't the time for "extra lean" beef. If you use 90/10 or 95/5 beef, your patties will be dry, crumbly, and won't develop that beautiful lacy edge.
We need the fat to render out and essentially fry the edges of the meat.
- 1.5 lb ground beef: Stick to 80/20 fat content for the best flavor and crust. Why this? The fat renders out to create a natural frying medium for the meat.
- 1 tsp fine sea salt: Essential for drawing out moisture to help with browning.
- 1 tsp cracked black pepper: Adds a sharp bite that cuts through the rich beef fat.
- 0.5 tsp garlic powder: Provides a background savory note without burning like fresh garlic would.
- 4 slices sharp cheddar cheese: Sharp cheddar has a lower moisture content than mild, meaning it melts into a velvety blanket rather than a watery pool.
- 0.5 cup avocado oil mayonnaise: A clean tasting base for our sauce that stays stable even when hitting the warm meat. Why this? It has a higher smoke point and richer mouthfeel than standard mayo.
- 2 tbsp sugar-free ketchup: Adds sweetness and body to the sauce without the blood sugar spike.
- 1 tbsp yellow mustard: The classic "taps" of acidity required for a burger profile.
- 1 tbsp dill pickle brine: This is my "secret" ingredient for thinning the sauce and adding a zip you can't get from vinegar alone.
- 0.5 tsp smoked paprika: Adds a hint of "charred grill" flavor even though we are cooking indoors.
- 6 cups shredded romaine lettuce: Provides the necessary "crunch" factor and volume for the base.
- 1 cup cherry tomatoes, halved: Sweet bursts of acid to balance the savory beef.
- 0.5 cup red onion, finely diced: Essential for that sharp, pungent kick that traditional burgers rely on.
- 0.5 cup sliced dill pickles: The final vinegary crunch that ties the whole bowl together.
Essential Tools for the Sear
You don't need a lot of gear for a Smash Burger Bowl, but the tools you do use must be up to the task. First and foremost, you need a heavy duty metal spatula. I’m talking about the kind that doesn't bend when you push on it.
If you use a flimsy plastic one, you won't be able to apply enough pressure to actually "smash" the beef. I once tried to use a wooden spoon to help press down let’s just say it was an awkward, ineffective mess.
A cast iron skillet or a flat top griddle is the gold standard here. These materials hold onto heat like a beast. When you put a cold ball of meat onto a cheap, thin aluminum pan, the temperature of the pan drops immediately, and you end up "grey cooking" your meat instead of searing it.
Also, having some parchment paper squares on hand is a game changer. It prevents the meat from sticking to your spatula when you're doing the smashing.
Mastering the Smash Technique

- Divide the beef. Form the 1.5 lb ground beef into 8 loosely packed balls, about 3 ounces each. Note: Packing them too tight will make the burger tough.
- Heat the pan. Set your cast iron over high heat until it begins to smoke slightly.
- Place and smash. Put the beef balls in the pan, leave space, cover with parchment, and press until less than 1/2 inch thick.
- Season the meat. Sprinkle the salt, pepper, and garlic powder over the raw side of the flattened patties.
- Sear for 2 minutes. Cook without moving them until a dark mahogany crust forms.
- Flip and cheese. Use a sturdy spatula to scrape the crust off the pan, flip, and immediately top with cheese.
- Finish the cook. Let the cheese melt for 60 seconds until the edges are bubbling.
- Whisk the sauce. Combine mayo, sugar-free ketchup, mustard, brine, and paprika in a small bowl until smooth and velvety.
- Build the base. Divide the 6 cups of romaine, tomatoes, onion, and pickles into four large bowls.
- Assemble the bowl. Place two patties into each bowl and drizzle generously with the signature sauce. Serve immediately.
Fixing Common Searing Mistakes
Why Your Beef Is Steaming
If your meat looks grey and is sitting in a pool of liquid, your pan wasn't hot enough or you overcrowded it. When you put too many cold patties in a pan at once, the temperature plummets. The moisture in the meat turns to steam before the surface has a chance to sear.
Next time, work in batches of two or three patties to keep that pan screaming hot.
Why Your Patties Crumble
This usually happens if you overwork the meat while forming the balls or if you try to flip them too early. The crust acts as a "glue" that holds the patty together. If you try to scrape it up before that crust has fully developed, you’ll leave the best parts stuck to the pan and end up with beef crumbles.
Patience is a virtue, even in a 20 minute recipe.
Quick Fix Troubleshooting
| Problem | Root Cause | Solution |
|---|---|---|
| Pale, grey meat | Pan temperature too low | Let the pan smoke slightly before adding meat |
| Cheese won't melt | Patties too cold or room too drafty | Cover the pan with a lid for 30 seconds after flipping |
| Soggy lettuce base | Sauce or beef added too early | Place beef on one side of the bowl, not directly on all the greens |
While we are on the topic of quick fixes, I’ve learned that the environment matters. If you're cooking in a humid kitchen, your lettuce might wilt faster. I usually keep my shredded romaine in the fridge until the very second I'm ready to assemble.
It's those little temperature differences that take a dish from "fine" to "I can't believe I made this."
Common Mistakes Checklist
- ✓ Pat the beef balls with a paper towel if they look wet (moisture is the enemy of the sear).
- ✓ Don't add oil to the pan; the beef fat is all the grease you need.
- ✓ Use a metal spatula only; plastic will melt and won't give you the leverage.
- ✓ Wait for the smoke if the pan isn't smoking, it isn't ready.
- ✓ Leave the patties alone for those first 2 minutes; no peeking!
Scaling for Any Size Crowd
If you're looking to cut this recipe in half for a solo dinner or a date night, it's pretty straightforward. You can use a smaller 8 inch skillet and just do two rounds of cooking. For the sauce, since we’re using small measurements like tablespoons, I recommend making the full batch of sauce anyway.
It stays fresh in the fridge and honestly makes a great dip for veggies the next day.
When you're scaling up to feed a crowd say, doubling the recipe for 8 people things get a bit trickier. You’ll want to move to a large outdoor griddle if you have one, or use two large skillets simultaneously.
If you try to cook 16 patties in one pan, the last person will be eating their Smash Burger Bowl while the first person is already doing the dishes. Also, remember my rule for spices: when doubling the meat, you only need to increase the salt and pepper by about 1.5x, or you might find the result a bit too aggressive on the palate.
If you’re doing a massive meal prep session, you might want to bake something else at the same time to maximize your kitchen energy. I often have some Peanut Butter Oatmeal Bars in the oven while I’m searing the beef on the stovetop. It makes the whole house smell like a mix of a bakery and a steakhouse, which is basically my version of heaven.
Flavorful Ways to Swap Ingredients
| Original Ingredient | Substitute | Why It Works |
|---|---|---|
| Ground Beef | Ground Turkey (93/7) | Leaner option; add 1 tsp olive oil to the pan for fat. Note: Will be less crispy. |
| Sharp Cheddar | Pepper Jack | Adds a spicy kick. Note: Melts slightly faster than cheddar. |
| Red Onion | Pickled Shallots | Offers a more delicate, acidic crunch than raw onion. |
If you want a "California Style" swap, you can add half an avocado to each bowl. The creaminess of the avocado plays beautifully with the smoky paprika in the sauce. Just be sure to season the avocado with a little extra salt and lime juice so it doesn't get lost in the mix.
Debunking Traditional Burger Myths
"Searing meat seals in the juices." This is probably the oldest myth in the book. Searing does not create a moisture proof barrier. In fact, the high heat actually causes the muscle fibers to contract and push moisture out. What searing actually does is create flavor through a complex browning process.
The reason our Smash Burger Bowl tastes so good isn't because it's "juicier," but because the crust provides a massive hit of umami that a boiled or steamed burger lacks.
"You should always use lean meat for a healthy bowl." Honestly, don't even bother with 95% lean beef for this. You’re already skipping the bun and the fries. The fat in 80/20 beef is what allows the meat to "smash" without sticking and gives you those crispy, lacy edges.
Using lean meat will result in a dry, "rubbery" texture that no amount of sauce can save. Balance your plate with the 6 cups of romaine instead of sacrificing the quality of your protein.
Smart Storage and Zero Waste
Storage Guidelines: The cooked beef patties will stay fresh in an airtight container in the fridge for up to 3 days. However, whatever you do, do not store the beef on top of the lettuce. Keep your components separate.
Store the shredded lettuce, diced onions, and halved tomatoes in their own containers. When you’re ready to eat, reheat the beef in a dry pan for 60 seconds to bring back some of that crispiness before assembling your bowl fresh.
I don't recommend freezing the assembled patties, as the texture of the melted cheese becomes a bit grainy upon thawing.
Zero Waste Tips: Don't toss out the stems of your romaine lettuce! You can thinly slice the crunchy hearts and mix them into a slaw or even regrow them in a small dish of water on your windowsill. If you have leftover red onion, toss it in the remaining pickle brine from the jar.
In 24 hours, you’ll have quick pickled onions that are incredible on top of eggs or tacos. Also, if you find yourself with extra beef fat in the pan, don't wash it down the drain.
Wipe it out with a paper towel and toss it in the trash, or save a tablespoon to sauté some kale for a different meal later in the week.
Best Pairings for This Bowl
Since this Smash Burger Bowl is already quite a complete meal with its mix of protein, fats, and fiber, you don't need much else. But, if you're serving this for a Saturday night dinner and want to feel a little extra, a side of air-fried green bean "fries" is a fantastic low carb companion.
The snap of the green beans matches the crunch of the romaine perfectly.
For a drink, I usually go with something highly carbonated and crisp. A lemon lime sparkling water or a dry kombucha helps cleanse the palate between those rich, cheesy bites of beef. It’s all about maintaining that balance. If you've finished your bowl and still have a bit of a sweet tooth, that’s usually when I reach for one of my Easy Healthy Protein Balls. They provide that little bit of sweetness without crashing your energy levels for the rest of the evening.
Right then, you're all set. Grab your heaviest spatula, turn that vent fan on high, and get to smashing. Once you taste those lacy edges, there's really no going back to a regular thick patty. Enjoy every crispy bit!

Recipe FAQs
Can I make this dairy-free?
Yes, simply omit the cheddar cheese slices. The patties remain flavorful on their own, and you can add extra pickles or red onions to compensate for the missing creaminess.
How to get the perfect crust on the beef?
Heat your cast iron skillet until it begins to smoke slightly before adding the meat. Once you press the patties to less than 1/2 inch thick, leave them undisturbed for the full 2 minutes to ensure a deep mahogany sear.
Is it true I should add oil to the pan to prevent sticking?
No, this is a common misconception. The natural fat from the 1.5 lb of ground beef is sufficient to prevent sticking and provides the necessary medium for frying the crust.
How to ensure the patties stay juicy?
Keep your beef loosely packed when forming the 3-ounce balls. If you enjoyed mastering this technique of handling ground protein gently, you will appreciate how we prioritize texture in our rice cooker burrito bowls.
How to properly flip the smashed patties?
Use a sturdy metal spatula to scrape firmly against the skillet surface. A firm, scraping motion is essential to lift the browned crust away from the pan so it stays attached to the meat.
Can I prepare the components ahead of time?
Yes, you can prep the vegetables and mix the smash sauce in advance. Keep the sauce refrigerated and assemble the fresh lettuce, tomato, onion, and pickle base just before cooking the patties for the best texture.
How to tell when the meat is done cooking?
Watch the clock strictly for the 2-minute sear and the 60-second melt time. Because the patties are less than 1/2 inch thick, this timing perfectly cooks the beef while ensuring the cheese is melted and the crust is intact.
Crispy Smash Burger Bowl
Ingredients:
Instructions:
Nutrition Facts:
| Calories | 442 kcal |
|---|---|
| Protein | 33.2 g |
| Fat | 30.8 g |
| Carbs | 11.7 g |
| Fiber | 2.4 g |
| Sugar | 5.1 g |
| Sodium | 785 mg |
