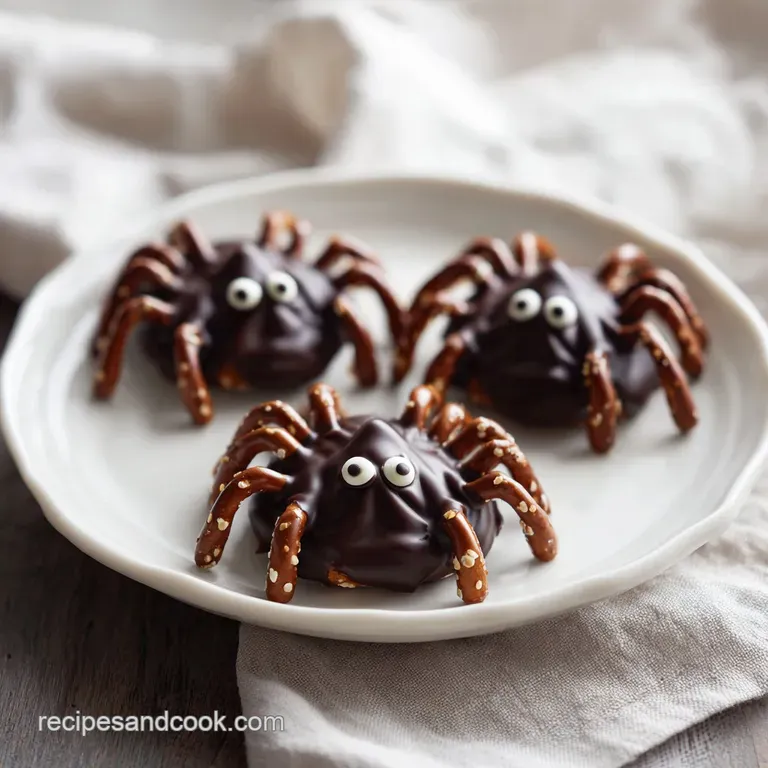
Dark Chocolate Pretzel Spiders
- Time: Active 15 minutes, Passive 30 minutes, Total 45 minutes
- Flavor/Texture Hook: Glossy dark chocolate meets a salty, crunchy pretzel snap.
- Perfect for: Last minute Halloween parties, kid friendly kitchen projects, or beginner friendly spooky treats.
- Mastering the Ultimate Easy Halloween Dessert Idea for Parties with Chocolate Spiders
- The Secret Physics Behind Glossy Chocolate
- Component Analysis and Ingredient Roles
- The Shopping List Breakdown
- Essential Tools for Precision
- Step-by-Step Guide to Crafting Chocolate Spiders
- Professional Plating Techniques
- Avoiding Kitchen Disasters and Common Mistakes
- Customizing Your Spooky Chocolate Spiders
- Chocolate Myths and Reality
- How to Store and Keep Your Spiders Fresh
- Perfect Beverage and Snack Complements
- Precision Checkpoints for Guaranteed Success
- Recipe FAQs
- 📝 Recipe Card
Mastering the Ultimate Easy Halloween Dessert Idea for Parties with Chocolate Spiders
Imagine the kitchen filling with the deep, earthy aroma of melting dark chocolate, that specific scent that makes you want to skip the party and eat the bowl. There is something so satisfying about the sound of a pretzel twist snapping into perfect "L" shapes a crisp, clean crack that promises a serious crunch.
Get ready to impress your guests with this one knockout, easy Halloween dessert featuring spooky chocolate spiders.
I remember the first time I tried making these; I rushed the melting process and ended up with a grainy, seized mess. But once I realized that a little almond butter acts like a safety net for the chocolate, it changed everything.
The result is a glossy, smooth finish that looks like it came from a high end bakery, even though we’re just using a microwave and a bit of patience.
This treat hits that golden ratio of sweet and salty that we all crave at a party. The dark chocolate provides a sophisticated bitterness that keeps it from being cloying, while the flaky salt on top makes the cocoa notes truly sing.
You’re not just making a "cute" snack; you’re making a high-quality chocolate confection that happens to look like a creepy crawly.
The Secret Physics Behind Glossy Chocolate
Emulsification Stability: Almond butter contains natural fats and lecithin which help prevent the dark chocolate from separating or blooming. This ensures the spider bodies remain sleek and dark rather than developing those dusty white streaks.
Thermal Inertia: By using 30 second bursts in the microwave, we control the heat rise. Chocolate is sensitive to "hot spots," and the almond butter helps distribute the energy evenly, preventing the proteins from scorching.
Structural Reinforcement: Breaking the pretzels into "L" shapes creates a cantilever effect. When the chocolate sets, it acts as a structural adhesive that locks the "legs" into the body, preventing them from falling off when guests pick them up.
Crystallization Control: Salt does more than season; the flaky sea salt provides a tiny textural interruption to the smooth chocolate, which actually makes the perceived "snap" of the treat feel more pronounced to your palate.
| Thickness of Body | Setting Time (Fridge) | Visual Cue for Done ness | Texture Profile |
|---|---|---|---|
| 1.5 cm | 20 minutes | Matte finish on surface | Soft fudge center |
| 2.5 cm | 30 minutes | Completely opaque and firm | Solid chocolate snap |
| 3.5 cm | 45 minutes | Hard shell, no fingerprint | Dense and rich |
Finding the right balance of thickness is key because if the spiders are too thin, the legs won't have enough "anchor" to stay upright. I usually aim for that middle ground of 2.5 cm to ensure they are sturdy enough to be piled onto a serving platter without losing limbs.
Component Analysis and Ingredient Roles
In this section, we look at why we chose these specific items. Using high-quality dark chocolate chips (60% cocoa or higher) is non negotiable because the lower quality stuff often contains too many fillers that won't melt smoothly with the almond butter.
| Ingredient | Science Role | Pro Secret |
|---|---|---|
| Dark Chocolate (60%+) | Provides the base structure and snap. | Use chips with cocoa butter listed as a top ingredient. |
| Natural Almond Butter | Softens the chocolate and prevents seizing. | Ensure it is "creamy" style to keep the finish silky. |
| Salted Pretzels | Adds structural "legs" and a salty contrast. | Choose thin twists for easier breaking into "L" shapes. |
| Flaky Sea Salt | Enhances flavor perception by suppressing bitterness. | Add while chocolate is molten for better adhesion. |
When you are picking out your almond butter, look for the kind that needs a good stir. That natural oil is exactly what helps the chocolate stay fluid and glossy during the assembly phase.
The Shopping List Breakdown
For this recipe, we are keeping the list tight and high-quality. You will need:
- 250g high-quality dark chocolate chipsWhy this? Dark chocolate provides a sophisticated flavor profile that isn't overly sugary.
- Substitute: Milk chocolate chips (Expect a softer set and sweeter taste).
- 60ml natural creamy almond butterWhy this? It adds a nutty depth and stabilizes the chocolate during melting.
- Substitute: Smooth peanut butter (Adds a stronger, more recognizable "PB" flavor).
- 1g flaky sea saltWhy this? It brightens the cocoa and cuts through the fat of the nut butter.
- Substitute: Standard kosher salt (Use half the amount; it lacks the "crunch" of flaky salt).
- 1 bag small salted pretzel twists (approx. 72 used)Why this? They provide the perfect "L" shape for spider legs once broken.
- Substitute: Pretzel sticks (Easier to use, but look less like "jointed" legs).
- 36 edible candy eyesWhy this? These provide the immediate "spooky" visual cue needed for the theme.
- Substitute: White icing dots with a tiny drop of melted chocolate in the center.
Chef's Tip: Freeze your chocolate chips for 10 minutes before melting. It sounds counterintuitive, but it helps the chips melt more evenly when they hit the microwave, preventing the outer edges from burning while the center is still hard.
Essential Tools for Precision
You don't need a professional pastry kitchen for this, but a few specific tools will make your life much easier. A microwave safe glass bowl is better than plastic because glass retains heat better, helping you finish the melting process without extra microwave time.
I also recommend using a small offset spatula if you have one. It allows you to "nudge" the chocolate into perfect circles without the mess of a spoon. If you’re hosting a full bash, these go great alongside Easy Halloween Drinks for that extra festive flair.
| Item | Budget Option | Premium Option | Impact on Result |
|---|---|---|---|
| Mixing Bowl | Plastic Tupperware | Tempered Glass Bowl | Glass holds heat longer for easier dipping. |
| Lining | Aluminum Foil | Silicone Baking Mat | Silicone prevents any sticking or tearing. |
| Spatula | Metal Spoon | Silicone Spatula | Silicone scrapes every drop of chocolate. |
Using a silicone mat or high-quality parchment paper is a must. If you try to set these directly on a plate or foil, the chocolate will bond to the surface and you’ll end up with "legless" spiders when you try to lift them.
step-by-step Guide to Crafting Chocolate Spiders
- Melt the foundation. Place 250g dark chocolate chips and 60ml almond butter in a microwave safe glass bowl.
- Heat in cycles. Microwave in 30 second bursts, stirring thoroughly after each interval until the mixture is glossy and fluid.Note: Stirring is what actually melts the chocolate, not just the microwave heat.
- Season the mix. Stir in 1g flaky sea salt. Note: This ensures the salt is distributed within the body, not just on top.
- Prepare the anatomy. Break the pretzel twists into 'L' shapes (you need 8 legs per spider). Note: Use the natural curves of the pretzel to mimic jointed legs.
- Form the bodies. Drop rounded tablespoons of the chocolate mixture onto a baking sheet lined with parchment paper.
- Attach the legs. While the chocolate is still molten, gently press four pretzel legs into each side of the body. Wait until the chocolate slightly thickens so the legs stay put.
- Add the eyes. Place two candy eyes on the front of each body, using the chocolate as the adhesive.
- Set the treats. Flash freeze for 5 minutes or refrigerate for 30 minutes until the chocolate is fully set and firm to the touch.
Chef's Tip: Dip the ends of the pretzel "legs" into a tiny bit of extra melted chocolate before sticking them into the body. This creates a "double bond" that makes them much harder to break during transport.
Professional Plating Techniques
For an easy Halloween dessert idea for parties with chocolate spiders, the presentation is what turns a snack into a centerpiece. You can go from "home kitchen" to "professional bakery" just by changing how you arrange them.
| Plating Level | Key Addition | Visual Effect |
|---|---|---|
| Simple | Plain white platter | Clean, minimalist, and spooky. |
| Polished | White chocolate "webs" | Adds contrast and a professional "scene." |
| Restaurant | Edible moss (crushed pistachios) | Adds color, texture, and an "outdoor" feel. |
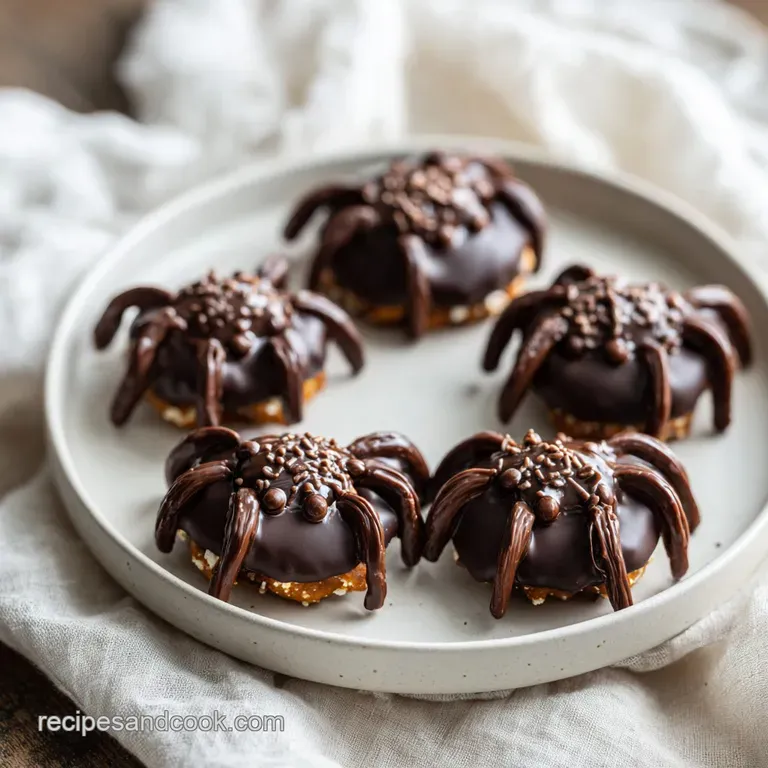
For a "Polished" look, melt a small amount of white chocolate and drizzle it in concentric circles on a plate, then drag a toothpick from the center outward to create a web. Place your spiders on top of the web for a stunning effect.
Avoiding Kitchen Disasters and Common Mistakes
The biggest hurdle with chocolate is moisture. One single drop of water in your bowl can cause the entire batch to "seize," turning it into a grainy, clumpy mess that won't pour or set. Always make sure your bowl and spatula are bone dry before you start.
Why Your Chocolate Seized
If your chocolate suddenly turns into a thick, gritty paste, it’s usually because of water or overheating. Even steam from a nearby boiling pot can do this. If this happens, you can sometimes save it by whisking in a teaspoon of neutral oil (like coconut oil), but it may never be as glossy as the original batch.
Why Your Legs Are Falling Off
If the pretzel legs keep sliding out, your chocolate mixture might be too warm and fluid. Let the chocolate "blobs" sit on the parchment paper for about 60 seconds before inserting the legs. This allows the chocolate to begin its crystallization process, creating a thicker "mud" that holds the pretzels in place.
| Problem | Root Cause | Solution |
|---|---|---|
| Grainy texture | Overheating or moisture | Melt in shorter bursts; keep all tools dry. |
| Legs won't stay | Chocolate is too thin | Let the body sit for 1 minute before adding legs. |
| Dull surface | Poor tempering/cooling | Flash freeze to set the fats quickly for a shine. |
Common Mistakes Checklist:
- ✓ Never cover the bowl in the microwave (condensation will fall into the chocolate).
- ✓ Use a dry metal spoon or silicone spatula (wood can hold hidden moisture).
- ✓ Break pretzels carefully; use a small paring knife to "score" them if they keep shattering.
- ✓ Don't skip the almond butter it’s the secret to the fudge like texture.
- ✓ Let the spiders reach room temperature for 10 minutes before serving for the best flavor.
Customizing Your Spooky Chocolate Spiders
If you want to vary the flavor, consider adding a drop of peppermint extract to the chocolate for a "Thin Mint" style spider. For those who need a school safe version, you can swap the almond butter for sunflower seed butter (SunButter). It has a similar fat content and works perfectly as a stabilizer.
If you prefer a different base, you could try these with Buttery Pastry bases instead of pretzels for a more "dessert tart" feel. Just bake the pastry rounds first, then top with the chocolate mixture.
Scaling the Recipe
Downscaling (Making 9 spiders): Simply halve the ingredients. Use a smaller bowl to ensure the chocolate doesn't spread too thin and burn in the microwave.
Upscaling (Making 36 spiders): Do not double the microwave time! Instead, melt the chocolate in two separate batches. Large amounts of chocolate are harder to heat evenly and are much more likely to scorch in the center while the edges stay cold.
| Method | Time | Texture | Best For |
|---|---|---|---|
| Microwave | 45 minutes total | Velvety and smooth | Speed and convenience. |
| Double Boiler | 60 minutes total | Ultra glossy | Maximum control and shine. |
| Slow Cooker | 2 hours | Fudge like | Large party batches. |
Chocolate Myths and Reality
A common myth is that you need a professional tempering machine to get a good snap. In reality, adding a fat like almond butter creates a "pseudo temper" that mimics the snap without the technical headache.
The fat molecules in the nut butter intersperse with the cocoa butter, creating a stable matrix that sets firmly at room temperature.
Another misconception is that "darker is always better." While 85% cocoa is healthy, it often lacks the fluidity needed to coat the pretzels properly. Stick to the 60% to 70% range for the best balance of workable texture and rich flavor.
How to Store and Keep Your Spiders Fresh
These chocolate spiders are quite hardy. You can store them in an airtight container in the fridge for up to 2 weeks. If you’re planning to serve them at a party, keep them chilled until about 20 minutes before guests arrive.
This keeps the pretzels from getting soft and ensures the chocolate doesn't melt on people's fingers.
For zero waste, take any leftover pretzel shards and broken chocolate bits and toss them together. Spread the mixture flat on a piece of parchment, let it set, and you’ve got "Spider Bark" a delicious snack for the cook while the main spiders are setting in the fridge!
Perfect Beverage and Snack Complements
When serving these at a party, think about balance. Since these are rich and salty, they pair beautifully with something acidic or sparkling. A cold glass of milk is the classic choice, but for an adult party, a dry Prosecco or a tart hibiscus tea works wonders.
If you are setting up a full dessert table, consider adding some Pink Heart Shaped Cake recipe pieces for a "Love and Spells" theme. The contrast between the dark, spooky spiders and the bright pink cake makes for a very Instagram worthy spread.
Decision Shortcut: If you want a softer, fudge like spider, use 20ml extra almond butter. If you want a more intense cocoa flavor, use 72% dark chocolate and a pinch of espresso powder.
If you want maximum crunch, use pretzel sticks instead of twists for the legs.
Chef's Tip: Add a tiny pinch of espresso powder to the melted chocolate. It doesn't make it taste like coffee, but it deepens the "chocolatey ness" of the dark chips, making them taste like a high end luxury brand.
Precision Checkpoints for Guaranteed Success
- 1. 30 Seconds
- Never microwave for longer than this at one time.
- 2. 5 Minutes
- The exact time needed in a freezer to "shock" the chocolate into a glossy set.
- 3. 1 Gram
- Don't eyeball the salt that one gram is the difference between "okay" and "bakery worthy."
These spiders aren't just a treat; they are a conversation piece. Once you master the "L" break of the pretzel and the almond butter stabilized melt, you’ll find yourself making these every October. They are simple, sophisticated, and satisfyingly spooky.

Recipe FAQs
Why is my chocolate seizing instead of becoming glossy and fluid?
Overheating or moisture contamination is likely the cause. Ensure your bowl is completely dry before adding ingredients and always heat in 30-second bursts to keep the chocolate stable. If you enjoyed learning how to manage temper and texture here, see how we apply similar precision in our easy fudge recipe.
How to ensure the pretzel legs stay attached to the spider bodies?
Insert the pretzels while the chocolate is still fully molten. Gently press the broken 'L' shaped twists into the sides of the chocolate mound immediately after dropping it onto the parchment paper to ensure a strong bond as the fat cools.
Is it true I should let the chocolate cool on the counter for hours?
No, this is a common misconception. You should flash freeze the spiders for 5 minutes or refrigerate them until firm to ensure they maintain their structural integrity and don't lose their shape.
How to get the perfect glossy finish on the spiders?
Stir thoroughly between every 30-second microwave interval. The mechanical action of stirring is what actually emulsifies the almond butter and chocolate into a smooth, glossy base, rather than just the heat from the microwave.
How to handle the flaky sea salt so it doesn't get gritty?
Stir the salt directly into the melted chocolate mixture. Adding the 1g of salt while the mixture is still fluid ensures the flavor is evenly distributed throughout the body rather than leaving large, crunchy grains on the surface.
Can I make these spiders ahead of time for a party?
Yes, they store perfectly in the refrigerator. Keep them in an airtight container to prevent the pretzel legs from absorbing moisture and becoming soft, which preserves their crunch for your guests.
How to break the pretzels so they look like spider legs?
Snap each twist into two distinct 'L' shapes. By carefully breaking each salted pretzel twist, you create two segments that provide the necessary curve and length to look like authentic spider legs.
Chocolate Pretzel Spider Treats

Ingredients:
Instructions:
Nutrition Facts:
| Calories | 125 kcal |
|---|---|
| Protein | 2.3 g |
| Fat | 7.0 g |
| Carbs | 13.7 g |
| Fiber | 1.6 g |
| Sugar | 7.4 g |
| Sodium | 67 mg |
